Checkr Pay (v1)
Checkr Pay is a modern, API-first payouts solution for your flexible workforce. Using the Checkr Pay API, you can:
- Onboard new workers to your platform (currently only 1099-NEC classified workers are supported)
- Issue instant payouts to workers (at no cost to your workers)
- Embed a co-branded Checkr Pay banking experience in your worker app or website (powered by embeddable web components)
- File tax forms at the end of the year (currently 1099-NEC)
Checkr Pay is run by the team that brought you Checkr - the fastest, easiest, and fairest way to run background checks. Learn more about Checkr here.
This Getting Started Guide is designed to help customers get up-and-running with Checkr Pay, both by providing the necessary context to understand the payment flow, and by giving technical guidance on how to work with the Checkr API. The Checkr Pay API uses resource-oriented URLs, supports HTTPS authentication and HTTPS verbs, and leverages JSON in all responses passed back to customers.
The following sections will walk you through the steps necessary to get started paying workers with the Checkr Pay API:
If you would like access to Checkr Pay, please contact our team to request a sandbox account. Our team will review your request and provision a set of sandbox API credentials. Sandbox environment requests are 100% free. Our sandbox does not use real PII or trigger real money movements. Once you are production-ready, please contact us and we will guide you through the onboarding process and enable live requests.
Authentication Example
$ curl -X POST https://api.checkrpay.com/customer/v0/payouts \
    -H 'Content-Type: application/json' \
    -H 'X-CHECKR-PAY-ACCESS-KEY: YOUR_API_KEY_HERE' \
    -H 'X-CHECKR-PAY-SECRET-KEY: YOUR_API_KEY_HERE' \
    -d '{
      "workerId": "fd09c9d3-067f-488e-937a-313de48da3e0",
      "metadata": "tx_1313101",
      "description": "$100 payout for a job well done!",
      "amountCents": 10000
    }'
The Checkr Pay team will prodide you with your Access Key and Secret Key.
Your Sandbox and Production accounts will have different keys.
Authenticate your requests by passing your Access ID in the X-CHECKR-PAY-ACCESS-KEY header, and your Secret Key in the X-CHECKR-PAY-SECRET-KEY header.
If you don’t include API credentials when making a request, or if you include incorrect or invalid credentials, Checkr Pay returns a 401 - Unauthorized error. If you include correct credentials, but attempt to access a resource you are not allowed to, Checkr Pay returns a 403 - Forbidden error.
Securing your API Credentials
Best practices for securing your API credentials include:
- Don't store your credentials in your codebase or commit it to version control. Instead, make the key securely available only in your production environment. For example, you may choose to store keys in environment variables.
- Don't store your API key on the client side. All requests should be made from the server side, and appropriate data should be passed to the client as needed.
- If an API key is compromised, Contact Checkr Pay Support to revoke it. The Checkr Pay team will expire the current key and issue you a new set of keys.
- Do not use your production API key for testing or development - all testing and development should be performed in the sandbox environment, with your sandbox credentials.
Your API key can be used to make any API call on behalf of your account, such as creating Workers and sending Payouts. In the future, we will support the creation of multiple API keys with varying privileges, enabling you to restrict access based on a least permissions model. However, for today, your API key has unlimited access and must be secured accordingly.
(Optional) Complete a Background Check
First, complete an optional background check for your worker via Checkr. The background check process validates the worker's eligibility to work on your platform (e.g. criminal records, license verification). --- > If you choose to use a Background Check, you must use a background check package with an SSN pointer Screening included. Typically any criminal search will include an SSN pointer screening. Other screening types do not provide the necessary PII for Checkr Pay to import. --- You can initiate and complete a background check programmatically via the Checkr API.
After completing a background check, the worker can onboard to Checkr Pay with just a single tap - because Checkr Pay securely pulls the worker's PII from their background check profile (with consent).
Onboarding Workers without a Background Check
To onboard workers who have not completed a background check, you can create the worker using the POST /worker endpoint and leave the backgroundCheckId blank. The worker will be asked to enter their PII during onboarding
Create a Worker
Create a Worker
$ curl -X POST https://api.checkrpay.com/customer/v0/workers \
    -H 'Content-Type: application/json' \
    -H 'X-CHECKR-PAY-ACCESS-KEY: CHECKR_PAY_PROD_1000333' \
    -H 'X-CHECKR-PAY-SECRET-KEY: CHECKR_PAY_PROD_83ebeabdec09f6670863766f792ead24d61fe3f9' \
    -d '{
        "metadata": "driver_12345",
        "backgroundCheckId": "e44aa283528e6fde7d542194",
        "profile": {
          "phoneNumber": "+14155552671",
          "email": "john@smith.com"
        }
      }'
After the worker has completed any onboarding steps within your platform, which may include a Checkr background check, onboard them to Checkr Pay by passing the worker's data to the Worker resource.
You can create a worker with just two pieces of information:
- Optional: The worker's Candidate ID from a completed Checkr Background Check (to enable Checkr Pay to pull the worker's PII automatically). If you choose to exclude the Background Check, please send this key with a
nullvalue. - The worker's contact information (email address, phone number, and mailing address)
Because Checkr Pay is embedded in your worker app or website, it is best practice to provide the same email address and phone number that the worker uses to login to your app/website. That way, the worker will receive Checkr Pay notifications (e.g., 2FA codes) wherever they receive other work-related notifications. Also, that ensures that the email and phone number are valid - preventing login issues down the line.
Remember to replace your API credentials with your API credentials in the cURL example on the right. See Workers for more details on creating workers.
Worker Creation Response
Worker creation response
{
  "id": "123e4567-e89b-12d3-a456-426614174000",
  "metadata": "driver_12345",
  "createdAt": "2022-09-27T20:41:13.680Z",
  "temporaryAuthenticationToken": "dNJDUdffkgn3k209rt73o223of",
  "backgroundCheckId": "e44aa283528e6fde7d542194",
  "profile": {
    "phoneNumber": "+14155552671",
    "email": "john@smith.com",
    "address": {
      "street": "245 E. 73rd Street",
      "street2": null,
      "city": "New York",
      "state": "NY",
      "postalCode": "10021",
      "country": "US"
    }
  },
  "status": "pending"
}
The Checkr Pay API responds immediately with the newly-created Worker object.
Store the ID for this new Worker object. You'll need this to send the worker a Payout later on.
Also note the returned temporaryAuthenticationToken value. You'll use this value to authenticate the worker for account activation via the embeddable component (see below).
Onboard the Worker
Example webhook for an activated Worker
{
  "id": "6400d928a800385b3002d473",
  "object": "event",
  "type": "worker.onboarded",
  "createdAt": "2022-09-27T20:42:13.680Z",
  "data": {
    "object": {
      "id": "7f9877a3-3cfc-4b62-a325-83fbabd532ad",
      "status": "onboarded",
      "backgroundCheckId": "d8aede80eab3714fc90f2b6b",
      "metadata": "meta-data-for-demo",
      "createdAt": "2023-03-02T17:13:12.741Z",
      "payoutMethods": {
        "available": [
          "CheckrPayBankAccount",
          "ACHDirectDeposit"
        ],
        "selected": "CheckrPayBankAccount"
      },
      "object": "worker"
    }
  }
}
Onboard your newly-created Worker by passing the temporaryAuthenticationToken to the embeddable component in your worker app or website. This component guides the worker through a one-tap process to complete the onboarding process (including legal consents).
After onboarding is complete, the worker is brought to the Checkr Pay embedded worker experience. They will see a $0 balance in their wallet until they recieve a payout. Refer to the Embeddables documentation for more information.
If webhooks are enabled, Checkr Pay pushes a status change webhook event to your webhook URL for every Worker state change - including when the worker is onboarded. Refer to the Webhooks documentation for more information.
The temporaryAuthenticationToken is temporary. The returned token can only be used to authenticate the worker into the embeddable Checkr Pay experience once, after which the token expires. The next time the worker opens the embeddable component, re-authenticate the worker by requesting a refreshed authentication token via the Authenticate a worker endpoint.
Send a Payout
$ curl -X POST https://api.checkrpay.com/customer/v0/payouts \
    -H 'Content-Type: application/json' \
    -H 'X-CHECKR-PAY-ACCESS-KEY: CHECKR_PAY_PROD_1000333' \
    -H 'X-CHECKR-PAY-SECRET-KEY: CHECKR_PAY_PROD_83ebeabdec09f6670863766f792ead24d61fe3f9' \
    -d '{
      "workerId": "fd09c9d3-067f-488e-937a-313de48da3e0",
      "metadata": "tx_1313101",
      "description": "$100 payout for a job well done!",
      "amountCents": 10000
    }'
Send a Payout response
{
  "id": "123e4567-e89b-12d3-a456-426614174000",
  "metadata": "tx_1313101",
  "description": "$100 payout for a job well done!",
  "workerId": "fd09c9d3-067f-488e-937a-313de48da3e0",
  "amountCents": 10000,
  "feeCents": 0,
  "status": "pending",
  "createdAt": "2022-09-27T20:41:13.680Z",
  "completedAt": null,
  "canceledAt": null,
  "cancelCode": null
}
After the worker is activated, send them a payout using the Payouts resource.
You can send a payout with just three pieces of information:
- The ID of the Worker to receive the payout;
- A payout amount (in cents); and
- A payout description (to be surfaced to the worker)
Optionally, you can also pass a metadata field with a custom identifier for the Payout. This identifier should be unique across all of your payouts.
Checkr responds immediately with a newly-created Payout in the pending status.
Listen For Completed Payout Webhook
Completed Payout webhook
{
  "id": "6400d928a800385b3002d473",
  "object": "event",
  "type": "payout.completed",
  "createdAt": "2022-09-27T20:41:17.680Z",
  "data": {
    "object": {
      "id": "b3883e4b-0100-4243-99f8-9716006d2a13",
      "workerId": "f6eb48d1-8f9c-4934-b8ef-dbafbcf98065",
      "createdAt": "2023-03-02T17:11:55.422Z",
      "amountCents": 250,
      "feeCents": 0,
      "description": "Payout to WorkerId: f6eb48d1-8f9c-4934-b8ef-dbafbcf98065 for 250 cents",
      "status": "completed",
      "object": "payout"
    }
  }
}
After creation, the Payout is processed asynchronously by the Checkr Pay payouts engine (typically within seconds).
The payout moves into the completed state, and the worker then has instant access to their funds. The worker is notified of the payout via email or SMS.
--- > If a worker has opted into a Direct Deposit solution, the funds transfer will be initiated within seconds, although funds availability is at the discretion of the receiving bank and may take 2-3 business days. ---
If webhooks are enabled, Checkr Pay pushes a status change webhook event to your webhook URL for every Payout state change. Refer to the Webhooks documentation for more information.
At the end of the tax year, file a 1099 for the worker as follows. --- >This section only applies if your workers are 1099 independent contractors. You must determine whether your workers are 1099 contractors or W-2 employees; Checkr Pay cannnot provide tax or legal advice. --- If your workers are W-2 employees (rather than 1099 contractors), you can still pay them with Checkr Pay. Your employees will benefit from the full Checkr Pay experience, including instant cash access and financial wellness. However, you'll need to generate W-2 pay statements and tax forms through a different platform. Contact us for recommended W-2 generation partners.
Create a Tax Record
Create a Tax Record
$ curl -X POST https://api.checkrpay.com/customer/v0/tax_records \
    -H 'Content-Type: application/json' \
    -H 'X-CHECKR-PAY-ACCESS-KEY: CHECKR_PAY_PROD_1000333' \
    -H 'X-CHECKR-PAY-SECRET-KEY: CHECKR_PAY_PROD_83ebeabdec09f6670863766f792ead24d61fe3f9' \
    -d '{
      "workerId": "fd09c9d3-067f-488e-937a-313de48da3e0",
      "taxYear": 2021,
      "taxFormType": "1099-NEC"
    }'
Create a Tax Record response
{
  "id": "123e4567-e89b-12d3-a456-426614174000",
  "workerId": "fd09c9d3-067f-488e-937a-313de48da3e0",
  "taxYear": 2020,
  "taxFormType": "1099-NEC",
  "generatedPdf": null,
  "generatedData": null,
  "status": "pending",
  "createdAt": "2022-09-27T20:41:13.680Z",
  "filedAt": null,
  "canceledAt": null,
  "cancelCode": null
}
First, create a TaxRecord with the Create a new TaxRecord endpoint.
You can create a TaxRecord with just three pieces of information:
- The ID of the Worker to file a 1099 for;
- The tax year to file the 1099 for; and
- The type of tax form to file for the worker (currently, the following tax forms are supported:
1099-NEC).
You will need to determine yourself which type of tax form to file for your worker; Checkr Pay cannot provide tax or legal advice. This endpoint will return a newly-created TaxRecord in the pending state.
Listen For Webhook
TaxRecord Waiting for Approval Webhook
{
  "id": "6400d928a800385b3002d473",
  "object": "event",
  "type": "tax_record.waiting_for_approval",
  "createdAt": "2022-09-27T20:41:13.680Z",
  "data": {
    "object": {
      "id": "123e4567-e89b-12d3-a456-426614174000",
      "workerId": "fd09c9d3-067f-488e-937a-313de48da3e0",
      "taxYear": 2020,
      "taxFormType": "1099-NEC",
      "generatedPdf": "VGhpcyBpcyBhIDEwOTkgUERGIGZvcm0u",
      "generatedData": {
        "void": false,
        "corrected": false,
        "calendarYear": 2020,
        "payerName": "NurseBolt, LLC",
        [...]
      },
      "status": "waitingForApproval",
      "createdAt": "2022-09-27T20:41:13.680Z",
      "filedAt": null,
      "object": "tax_record"
    }
  }
}
The TaxRecord is generated asynchronously by the Checkr Pay tax engine (typically within seconds). Once the TaxRecord has been generated, it is populated with the following data:
- A
generatedDataobject containing the values that Checkr Pay generated for each box of the 1099 form; - A
generatedPdffield containing the actual 1099 PDF form that will be transmitted to the IRS and worker (represented in Base 64 format)
When you receive this webhook, you can use it to trigger custom business logic (e.g., an internal review flow).
Approve TaxRecord
Approve a Tax Record
$ curl -X PUT https://api.checkrpay.com/customer/v0/tax_records/123e4567-e89b-12d3-a456-426614174000 \
    -H 'Content-Type: application/json' \
    -H 'X-CHECKR-PAY-ACCESS-KEY: CHECKR_PAY_PROD_1000333' \
    -H 'X-CHECKR-PAY-SECRET-KEY: CHECKR_PAY_PROD_83ebeabdec09f6670863766f792ead24d61fe3f9' \
    -d '{
      "status": "approved",
      "taxYear": 2020
    }'
Approve a Tax Record response
{
  "id": "123e4567-e89b-12d3-a456-426614174000",
  "workerId": "fd09c9d3-067f-488e-937a-313de48da3e0",
  "taxYear": 2020,
  "taxFormType": "1099-NEC",
  "generatedPdf": "VGhpcyBpcyBhIDEwOTkgUERGIGZvcm0u",
  "generatedData": {
    "void": false,
    "corrected": false,
    "calendarYear": 2020,
    "payerName": "NurseBolt, LLC",
    [...]
  },
  "status": "approved",
  "createdAt": "2022-09-27T20:41:13.680Z",
  "filedAt": null
}
Once you are ready to file the 1099, you can do so using the Update a TaxRecord endpoint. Call this endpoint with a new status of approved.
This endpoint will return an update TaxRecord in the approved state.
Listen For Webhook
TaxRecord Webhook
{
  "id": "6400d928a800385b3002d473",
  "object": "event",
  "type": "tax_record.filed",
  "createdAt": "2022-09-27T20:42:13.680Z",
  "data": {
    "object": {
      "id": "123e4567-e89b-12d3-a456-426614174000",
      "workerId": "fd09c9d3-067f-488e-937a-313de48da3e0",
      "taxYear": 2020,
      "taxFormType": "1099-NEC",
      "generatedPdf": "VGhpcyBpcyBhIDEwOTkgUERGIGZvcm0u",
      "generatedData": {
        "void": false,
        "corrected": false,
        "calendarYear": 2020,
        "payerName": "NurseBolt, LLC",
        [...]
      },
      "status": "filed",
      "createdAt": "2022-09-27T20:41:13.680Z",
      "filedAt": "2022-09-27T20:42:13.680Z",
      "object": "tax_record"
    }
  }
}
The TaxRecord is filed asynchronously by the Checkr Pay tax engine (typically within seconds).
Once filing is complete, the TaxRecord is moved to the filed status. This status indicates that:
- The 1099 form has been successfully e-filed with the IRS; and
- The 1099 form has been transmitted to the worker, and is now available for viewing in the worker's embedded Checkr Pay experience.
The worker also receives an email notification with a link to securely view their 1099 form.
Congratulations! You have successfully created and paid your new worker, and satisfied your 1099 filing obligation - with just a few Checkr Pay API calls.
Continue scrolling for more detailed reference documentation for the Checkr Pay API.
Use webhooks to receive updates on objects created with the API and to kick off additional workflows based on these events. Each time an event that you subscribed to occurs, Checkr submits a POST request to the designated webhook URL with information about the event. The request also includes a full copy of the related object (e.g., the Worker object).
To enable webhooks for your account, contact your Checkr Pay Implementation Manager or Solution Architect and provide them with your desired Webhook endpoint.
Events are how we let you know when a resource on your account changes (e.g., when a worker is activated, or a payout is created). When a resource is changed, we log an Event object and send you a webhook with a JSON representation of the Event.
The table below describes the attributes of an Event.
| Parameter | Type | Description |
|---|---|---|
id |
string | ID of the Event. Unique for every Event. |
object |
string | Always set to event. This indicates that the webhook contains an Event object. |
type |
string | The type of Event. For example, worker.activated or payout.completed. The possible event types are described in this documentation. |
createdAt |
integer | Timestamp for the event, in ISO 8601 format. |
data |
hash | The data associated with the event. Typically contains an object of the resource related to the event. |
Checkr Pay can send webhooks to most public-facing web endpoints. Specifically, we can send webhooks to any HTTP(s) URI that meets the following format:
http(s)://(<user>:<password>@)<hostname>/<path>
For example, https://notify.company.com/checkr-pay is a valid webhook URI.
A few guidelines for selecting your webhook endpoint:
- The endpoint to be reached must be public.
- HTTP can be used only in the Sandbox environment. Live environment webhooks must be HTTPS.
- Basic Auth is supported by adding
username:password@in front of the hostname (credentials must be URL encoded)
Your endpoint should respond to webhooks as quickly as possible. To acknowledge receipt of a webhook, your endpoint must return a 2xx HTTP status code. This status code should only indicate receipt of the message, not acknowledgment that it was successfully processed by your system. Any other information returned in the response headers or response body is ignored.
It is best practice to store received webhooks in your database for asynchronous processing. That way, you can return a 2xx HTTP status code to our system immediately - and we won't attempt automatic retries if your system encounters an error. (See Retries).
Webhook logs can be found on the Developer Settings page.
For greater security, verify that the requests you receive come from Checkr Pay.
We pass along a hash signature with each request in the header X-Checkrpay-Signature. The hash signature is generated with the HMAC algorithm, using a pre-shared key as a key and SHA256 digest mode. When you receive a request, you can compute a hash and ensure that the one from Checkr matches.
When requesting that Checkr Pay activate a webhook endpoint for you, we will point the webhooks for your environment at your defined endpoint. We will generate a separate secret key that we will share with you.
Example hash signature computation:
Sample calculated HMAC Value: e08cb839c1ca79d32683ffb95de0519cf6c4d23d22785696289e69695941f9f5
Generated from the following:
Sample secret key: JSdaWqpxuQsT0J9qMped8PLTjMvsMnsg
Sample object
  {
    "createdAt": "2024-11-04T19:30:35.476Z",
    "data": {
      "object": {
          "amountCents": -20000,
          "createdAt": "2024-11-04T19:30:35.284Z",
          "description": "Repayment for: PayoutTest",
          "feeCents": 0,
          "id": "ed87cb1e-eb78-41c2-b978-40c4da93794f",
          "issuanceStrategy": {
              "name": "instant"
          },
          "object": "payout",
          "repaymentFor": "f15f64e7-a333-4adc-bb1d-d5c63123c016",
          "status": "pending",
          "workerId": "851cc9cf-a7d7-45c5-9f7d-09e1baf6f0ea"
      }
  },
  "id": "672920dbcd9b36bf966fbc49",
  "object": "event",
  "type": "payout.repayment_created"
}If a webhook is not successfully acknowledged with a 2xx HTTP status code, Checkr will automatically retry the webhook every minute for 10 minutes, then every hour for 24 hours. Webhooks failing for more than 7 consecutive days are automatically deleted.
While webhooks are helpful for updates, they are not foolproof. In some cases, report updates can be sent in rapid succession based on multiple events within the Checkr Pay environment, and may be "mis-heard". For robust webhook handling, we recommend that you account for the following:
- Duplicate reports (idempotency)
- Webhook misses
- Out-of-order webhooks
As a best practice, Checkr Pay recommends that you build a safety net to account for duplicate and out-of-order webhooks. One option might be to build in a function that aggregatess all Events, and processes only one Event of a given type per object (e.g., one worker.activated event per Worker).
To address missed webhook updates, you may also consider adding a function to send an alert if no update of a given type is sent within a certain number of days. This may indicate that an object has not moved on from an intermediary state (e.g., a worker who dropped out of the onboarding funnel will stay in the pending status).
Example webhook for an activated Worker
{
  "id": "6400d928a800385b3002d473",
  "object": "event",
  "type": "worker.activated",
  "createdAt": "2022-09-27T20:41:13.680Z",
  "data": {
    "object": {
      "id": "7f9877a3-3cfc-4b62-a325-83fbabd532ad",
      "status": "pending",
      "backgroundCheckId": "d8aede80eab3714fc90f2b6b",
      "metadata": "meta-data-for-demo",
      "createdAt": "2023-03-02T17:13:12.741Z",
      "payoutMethods": {
        "available": [
          "CheckrPayBankAccount",
          "ACHDirectDeposit"
        ],
        "selected": "CheckrPayBankAccount"
      },
      "profile": {
        "legalName": "Mock Candidate",
        "phoneNumber": "+14156566000",
        "email":"example.worker@gmail.com",
        "address": {
          "street": "Example Address Line 1",
          "city": "Example City",
          "state": "CA",
          "postalCode": "94401",
          "country": "US",
          "street2": "Example Address Line 2"
        }
      },
      "object": "worker"
    }
  }
}
Worker events are issued every time a Worker object is updated. For example, when a Worker has completed onboarding, you will receive a worker.onboarded event - signifying that the Worker has completed the necessary onboarding steps and is now ready to receive payouts.
The following events can be issued during the lifecycle of a single Worker:
| Event | Description |
|---|---|
worker.created |
A new Worker has been created. |
worker.manual_review |
An exception has been raised requiring manual review of the Worker. The Worker will be cleared from this state within 2 business hours. |
worker.onboarded |
A Worker has been onboarded (a worker completed onboarding forms but has not yet completed the banking Know Your Customer(KYC) process). |
worker.activated |
A Worker has been activated (a worker has completed the KYC checks and a Checkr Pay account has been opened). |
worker.contact_updated |
A Worker's name, email, phone number, or address has been updated. |
worker.payout_method_updated |
A worker changed their payout method |
worker.denied |
A Worker has been denied. |
worker.updated |
A Worker has been updated. |
worker.pending_closure |
An account closure has been initiated. The worker's account will be closed in 7 business days. |
worker.closed |
A Worker account has been closed. |
Example webhook for a completed Payout
{
  "id": "6400d928a800385b3002d473",
  "object": "event",
  "type": "payout.completed",
  "createdAt": "2022-09-27T20:41:16.680Z",
  "data": {
    "object": {
       "id": "b3883e4b-0100-4243-99f8-9716006d2a13",
       "workerId": "f6eb48d1-8f9c-4934-b8ef-dbafbcf98065",
       "createdAt": "2023-03-02T17:11:55.422Z",
       "amountCents": 250,
       "feeCents": 0,
       "description": "Payout to WorkerId: f6eb48d1-8f9c-4934-b8ef-dbafbcf98065 for 250 cents",
       "status": "completed",
       "object": "payout"
    }
  }
}
Example webhook for a queued Payout
    "id": "28838d7d-b145-4b40-b094-3690a66883b1",
    "createdAt": "2024-09-10T15:33:48.282Z",
    "amountCents": 3000,
    "feeCents": 0,
    "metadata": "C-002-TEST-004",
    "description": "New Payout without queue",
    "issuanceStrategy": {
        "name": "manual"
    },
    "status": "queued",
    "queuingReason": "waiting_on_manual_issuance",
    "workerId": "285dedcd-4146-4164-91a6-4bef52c6967c",
    "object": "payout"
}
Payout events are issued every time a Payout object is updated. For example, when a Payout has completed, you will receive a payout.completed event - signifying that the Payout is completed and the funds are available in the worker's account. You can use Payout events to trigger custom workflows, such as internal reconciliation, or custom notifications to workers notifying them a cashout has cleared. Additionally, if you have chosen to issue payouts using an issuanceStrategy such as manual, you will get webhooks sent to you after taking action such as releasing or canceling a queued payout for a worker.
The following events can be issued during the lifecycle of a single Payout:
| Event | Description |
|---|---|
payout.pending |
A new Payout has been created. |
payout.completed |
A Payout has been completed. The funds are available in the Worker's account. |
payout.canceled |
A Payout has been canceled. |
payout.failed |
The Payout failed to be issued. Payout#failureReasons would have details. |
payout.queued |
The Payout was queued, and will be issued once the criteria identified in the queuingReason field within the webhook are satisfied. Currently this includes waiting_on_manual_issuance - a payout was issued using a manual issuanceStrategy. The customer needs to release the payout to the worker. waiting_on_worker_account_activation - the worker has not yet activated their account and defined a payout preference, so Checkr Pay cannot issue the payout. The worker needs to complete onboarding steps. Once complete, the queued payout will be processed and funds withdrawn from your Checkr Pay account. |
payout.repayment_created |
A repayment for the payout was created. |
Example webhook for a filed TaxRecord
{
  "id": "6400d928a800385b3002d473",
  "object": "event",
  "type": "tax_record.filed",
  "createdAt": "2022-09-27T20:42:14.680Z",
  "data": {
    "object": {
      "id": "123e4567-e89b-12d3-a456-426614174000",
      "workerId": "fd09c9d3-067f-488e-937a-313de48da3e0",
      "taxYear": 2020,
      "taxFormType": "1099-NEC",
      "generatedPdf": "VGhpcyBpcyBhIDEwOTkgUERGIGZvcm0u",
      "generatedData": {
        "void": false,
        "corrected": false,
        "calendarYear": 2020,
        "payerName": "NurseBolt, LLC",
        "payerAddress": {
          "street": "1 Montgomery Street Suite 1234",
          "city": "San Francisco",
          "state": "CA",
          "zip": "94104"
        },
        "recipientTinRedacted": "xxx-xx-1234",
        "recipientName": "Jenny Terry Smith",
        "recipientAddress": {
          "street": "437 Lytton",
          "city": "Palo Alto",
          "state": "CA",
          "zip": "94301"
        },
        "recipientAccountNumber": null,
        "boxOneCents": 1000,
        "boxTwo": false,
        "boxFourCents": 1000,
        "boxFive": null,
        "boxSix": null,
        "boxSeven": null
      },
      "status": "filed",
      "createdAt": "2022-09-27T20:41:13.680Z",
      "object": "tax_record",
    }
  }
}
TaxRecord events are issued every time a TaxRecord object is updated. For example, when a TaxRecord has been filed, you will receive a filed event - signifying that the TaxRecord has been filed with the IRS and transmitted to the Worker. You can use Payout events to trigger custom workflows, such as custom notifications to workers notifying them of their available tax form.
The following events can be issued during the lifecycle of a single TaxRecord:
| Event | Description |
|---|---|
tax_record.pending |
A new TaxRecord has been created. |
tax_record.waiting_for_approval |
A TaxRecord is waiting for your approval.. |
tax_record.approved |
A TaxRecord has been approved and is pending filing. |
tax_record.canceled |
A TaxRecord has been canceled. |
tax_record.filed |
A TaxRecord has been filed with the IRS. |
| Event | Description |
|---|---|
account_funding_completed |
The deposit initiated from the Pay dashboard to fund payouts is available for use. |
account_received_payment_completed |
An ACH transfer has settled and become available within a customer's Checkr Pay account |
{
  "id": "6685b3c97a70716137921d50",
  "object": "event",
  "type": "account_funding_completed",
  "createdAt": "2024-07-03T20:25:45.822Z",
  "data": {
    "object": {
      "availableBalanceCents": 9224266,
      "completedAt": "2024-07-03T20:25:45.822Z",
      "fundedAmountCents": 1234,
      "initiatedAt": "2024-07-03T19:07:58.846Z"
    }
  }
}The Checkr Pay Embeddable is a full service neobanking experience that can be embedded directly in your worker app or website - with just a few lines of code.
Your workers can use the Embeddable to access their debit card, view transactions and statements, save for taxes, and more - all without leaving your app or website.
The Embeddable can be embedded anywhere in your app/website; you are in full control of your branding and UX.
Our team has designed the Embeddable to be striaghtforward and easy to integrate. Features include:
- Responsive design. The Embeddable can be adjusted to fit any viewport size that your worker experience supports today.
- Customization. The Embeddable can be customized to match your worker experience.
- Ease of integration. The Embeddable is a static asset hosted on the Checkr CDN. You can embed it as you would embed any other static web asset (e.g., via an iframe or Webview).
- Language/Framework Agnostic. Checkr Pay can be embedded in any web or mobile application, regardless of your tech stack.
We have included an integration checklist below that will get you up-and-running quickly. By following this checklist, you can ship the Checkr Pay Embeddable to your workers with just a few hours of development.
As you complete this checklist, make sure to stay in touch with the Checkr Pay implementations team. We can provide real-time implementation support - including architecture, code review, and code samples. We can also help you customize your embeddable design (including logo, color scheme, and select copy).
Example Authentication Endpoint (Express.JS)
import axios from 'axios'; import { Router } from 'express' import { requireActiveSession } from '@/middleware/authentication'
const router = Router()
// The worker must be logged into your application before they can authenticate to Checkr Pay. // Hence, we gate this endpoint behind authentication middleware. // For the purpose of this code sample, we call the middleware requireActiveSession. // However, you are responsible for worker authentication and can implement this however you would like. router.get('/checkr_pay_authenticate', requireActiveSession, (req, res, next) => {
// Get the Checkr Pay ID for the logged-in user
const { checkrPayId } = res.locals.user;
// Generate a TAT and return to the frontend
const checkrPayApiResponse = await axios.get(
`https://api-sandbox.checkrpay.com/customer/v0/workers/${checkrPayId}/authenticate`,
{
headers: {
'x-checkr-pay-access-key': process.env.CHECKR_PAY_ACCESS_KEY,
'x-checkr-pay-secret-key': process.env.CHECKR_PAY_SECRET_KEY
}
}
)
return res.send({
token: checkrPayApiResponse.data.temporaryAuthenticationToken
})
})
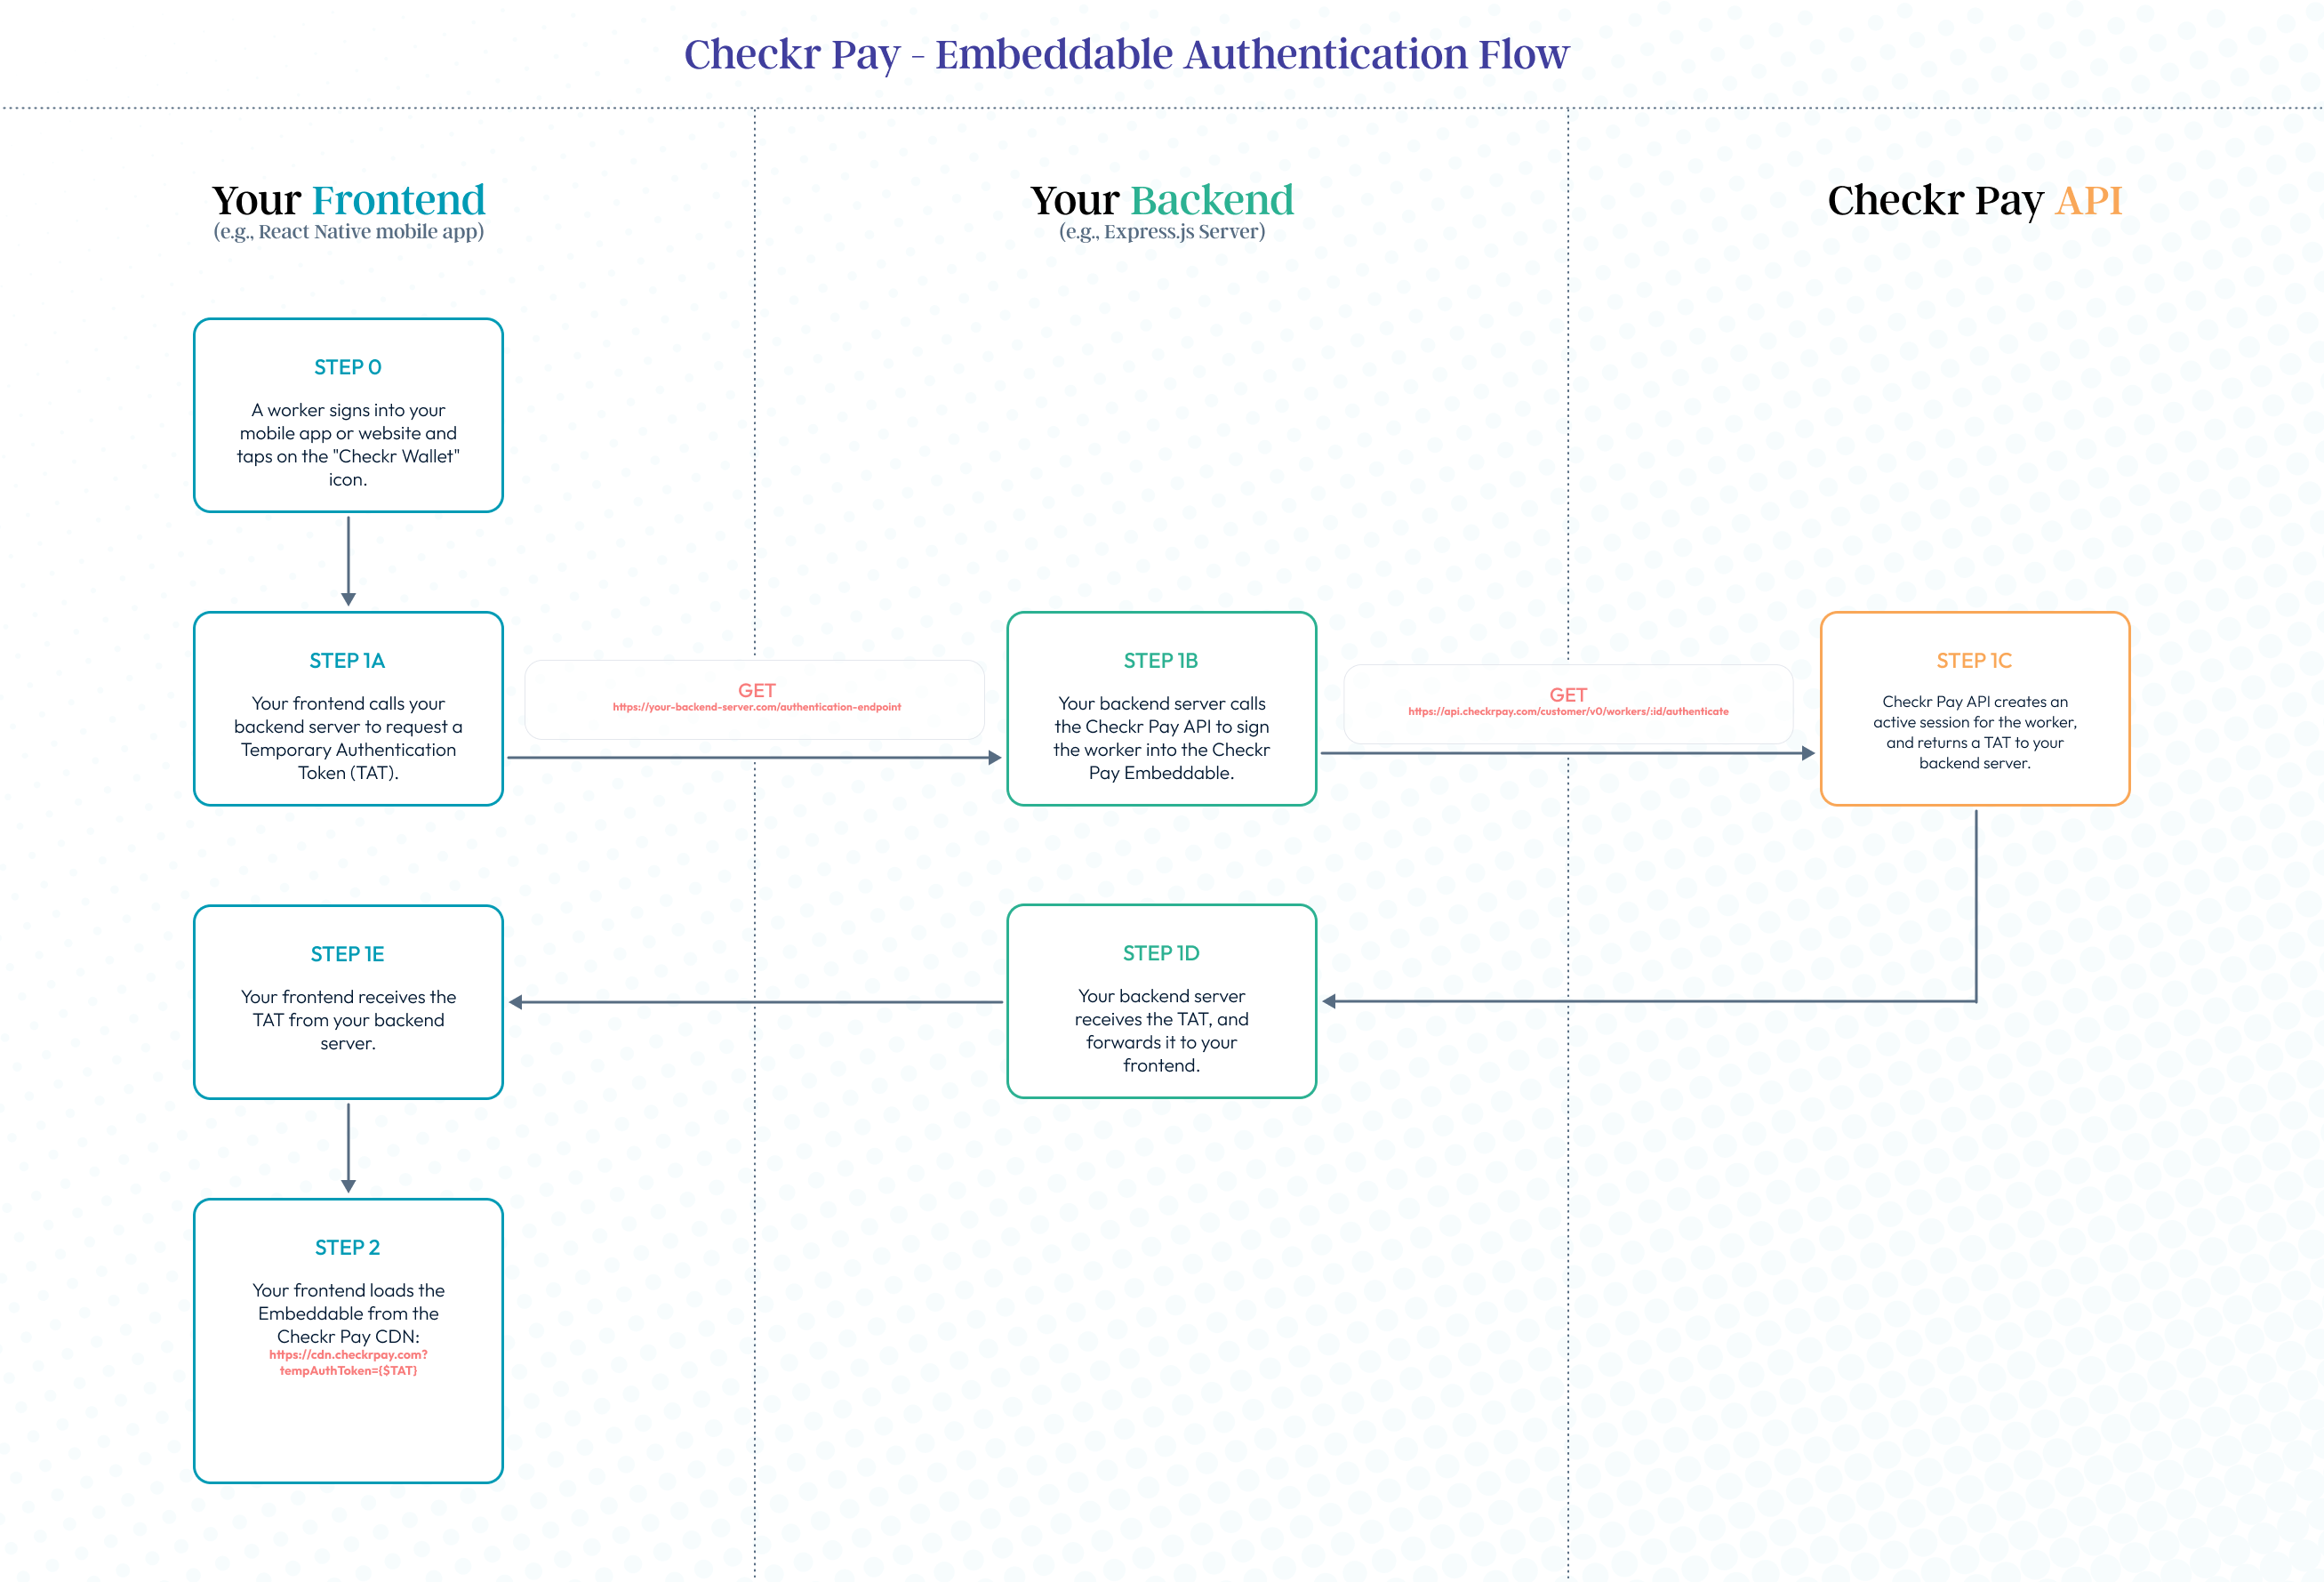
export default routerThe Checkr Pay Embeddable displays sensitive information to your worker (such as their debit card and earnings details). For security reasons, Checkr Pay needs to authenticate your workers before displaying this information.
With some minor changes to your backend, this experience can be seamless. You can show your workers a personalized Checkr Pay experience, without the need to sign in again. How does this work?
First, the worker signs into your web or mobile application with your existing authentication flow. This step is controlled entirely by you, independent of Checkr Pay.
Once a worker has logged into your application, the worker is shown a Navigation Element in the frontend to access Checkr Pay (such as a menubar icon). When the worker taps the navigation element, your backend server calls the Authenticate a Worker API endpoint to fetch a one-time session token (a Temporary Authentication Token, or TAT) for the worker. Your frontend then uses the session token to display the Checkr Pay embeddable to the worker. Checkr Pay handles the remaining authentication steps (including a one-time SMS verification code, and dynamic fraud monitoring).
To implement authentication, create an Authentication Endpoint on your backend that completes the above tasks. These tasks are also summarized below, and a sample Express.JS implementation is included in the right-hand side of the screen.
Authentication Endpoint Checklist
- Validate that the worker has an active session in your application (i.e., ensure the worker is logged in).
- Call the Authenticate a Worker Checkr Pay API, which returns a Temporary Authentication Token.
- Return the Temporary Authentication Token to the frontend (which uses it to render the embeddable).
Enhance your Earner's Experience!
When building your authentication flow, Checkr Pay strongly recommends implementing the
x-checkr-pay-worker-session-idheader. Doing so will significantly improve your earners' experience because they will only be asked to complete 2FA one time during their session.
Authentication Flowchart
The above tasks are also summarized in the flowchart below.
Example Checkr Pay Screen (React Native)
function PayScreen() {
  // AuthContext contains any data you need to authenticate requests to your backend.
  // Typically, you will store a session token or other time-limited credential in this context.
  const authContext = useContext(AuthContext);

  // Local state to store your worker's Checkr Pay TAT.
  // PayScreen is responsible for fetching a new TAT from your backend every time it is mounted.
  const [token, setToken] = useState(null);

  useEffect(() => {
      // Fetch a new TAT from your backend every time the component is mounted
      // (not on every render - otherwise, we hit an infinite loop, because calling setToken triggers a re-render!)
      if(!token) {
        axios.get("https://your-backend-server.com/authentication-endpoint", { headers: { 'x-session-token': authContext.state.token } } ).then((result) => {
          // Updating state triggers re-render (which will show webview)
          setToken(result.data.token);
        }).catch((error) => {
          console.log(`Error: ${JSON.stringify(error)}`);
        });
      }
  });

  const styles = StyleSheet.create({
    container: {
      flex: 1,
      height: '100%',
      backgroundColor: '#fff',
      alignItems: 'center',
      justifyContent: 'center',
    },
    webView: {
      width: 380
    }
  });

  // When token is blank, show a loading indicator.
  // When token is populated via the async effect above, show the webview.
  return (
    <SafeAreaView forceInset={{top: 'always'}} style={styles.container}>
      {
        token ?
        <WebView
          style={styles.webView}
          automaticallyAdjustContentInsets={false}
          source={{
            uri: `https://cdn-sandbox.checkrpay.com?tempAuthToken=${token}`
          }}
          // Intercept any URL change, and if that URL differs from the original one,
          // Stop the loading, preventing the page change, and open it in the OS navigator instead
          onNavigationStateChange={async (event) => {
            const uriSubdomain = uri.split('.')[0]
            const navigationUrlSubdomain = event.url.split('.')[0]
            if (navigationUrlSubdomain !== uriSubdomain) {
              webviewRef.stopLoading();
              await Linking.openURL(event.url);
            }
          }}
          onError={(e) => {
            webviewRef.reload()
          }}
        />
        :
          <Text>Loading Pay...</Text>
      }
    </SafeAreaView>
  );
}
Add a screen to your frontend application that displays the Checkr Pay Embeddable to your workers. The Embeddable is a static asset that can be loaded from the Checkr Pay CDN.
You can display the Embeddable just as you would display any other static web asset; for example, you can load an HTML5 Web Component, an Inline iframe, an Android Webview, an iOS Webview, or a React Native Webview.
When you load the embeddable from the Checkr Pay CDN, you'll need to provide a Temporary Authentication Token (TAT) as a URI query parameter. This will personalize the experience for your signed-in worker. The TAT can be obtained from your backend's Authentication Endpoint, implemented in the previous step.
To implement the Checkr Pay embeddable, create an screen on your frontend that performs the above tasks. These tasks are also summarized below, and a sample React Native implementation is included in the right-hand side of the screen.
Code samples are available for many common frameworks and languages, such as Flutter, React Native, Swift, and Kotlin. If you would like a code sample, or have questions about your specific implementation, we're here to help. Contact us at customersupport@checkrpay.com.
Checkr Pay Screen Checklist
Every time the screen is opened, call your backend Authentication Endpoint to request a TAT.
Load the the Embeddable from the Checkr Pay CDN URI. The Sandbox and Production URIs are included below for your reference. Note that the TAT is included as a query parameter.
Sandbox:
https://cdn-sandbox.checkrpay.com?tempAuthToken=$TempAuthTokenProduction:
https://cdn.checkrpay.com?tempAuthToken=$TempAuthToken
Ensure that the screen has a large enough viewport to accomodate the Checkr Pay experience. Minimum sizes are as follows:
Height > 460px
Width > 350px
Capture navigation within the webview to links other than
checkrpay.com. These links should be opened in the mobile device default browser, rather than the webview. This allows users to navigate to external websites, such as our support helpdesk and bank account link flow.In React Native, use the
onNavigationStateChangehook. See the code sample above.In iOS WebKit, use the
WKNavigationActionobject.In Android, override the
shouldOverrideUrlLoadingmethod.
The Checkr Pay REST API allows you to interact with Workers, Payouts, and TaxRecords. This section provides basic guidance on interacting with the API.
All URLs referenced in the documentation have the following base:
- Production Environment:
https://api.checkrpay.com/customer/ - Sandbox Environment:
https://api-sandbox.checkrpay.com/customer/
The Checkr Pay REST API is served over HTTPS. To ensure data privacy, unencrypted HTTP is not supported.
You must specify an API version in every request to the Checkr Pay API. The version is specified in the first path element after the Base URL. For example, access v0 of the Worker resource as follows: https://api.checkrpay.com/customer/v0/workers.
The most recent version of Checkr Pay is v0. When backwards incompatible changes are made to the Checkr Pay API, a new version will always be released.
Example request
$ curl -v -X POST https://api.checkrpay.com/customer/v0/workers \
    -H "Content-Type: application/json" \
    -H 'X-CHECKR-PAY-ACCESS-KEY: CHECKR_PAY_PROD_1000333' \
    -H 'X-CHECKR-PAY-SECRET-KEY: CHECKR_PAY_PROD_83ebeabdec09f6670863766f792ead24d61fe3f9' \
    -d '{"metadata": "driver_12345", "backgroundCheckId": "e44aa283528e6fde7d542194", "profile": {"phoneNumber": "+14155552671", "email": "john@smith.com"}}'
The Content-Type entity header is used to describe the media type of a resource. In requests, a Content-Type header tells the server what type of data is being sent. In responses, it tells the client what type of data the returned content actually is.
Our platform accepts and returns data in the application/json format, as is typical for RESTful APIs.
Example paginated request
$ curl -X GET https://api.checkrpay.com/customer/v0/payouts?workerId=123e4567-e89b-12d3-a456-426614174000&page=2&per_page=25 \
    -H 'X-CHECKR-PAY-ACCESS-KEY: CHECKR_PAY_PROD_1000333' \
    -H 'X-CHECKR-PAY-SECRET-KEY: CHECKR_PAY_PROD_83ebeabdec09f6670863766f792ead24d61fe3f9' \
Example paginated payload
{
  "data": [
    { "id": "123e4567-e89b-12d3-a456-426614174000", ... },
    { "id": "0348eccf-f673-4482-be77-97d9e93e4f30", ... }
  ],
  "next_href": null,
  "previous_href": "http://api.checkrpay.com/customer/v0/payouts?page=1&per_page=25",
  "count": 27
}
Pagination is enabled for endpoints that return a list of records.
There are two parameters that control pagination: page, which specifies the page number to retrieve, and per_page, which indicates how many records each page should contain. The default value of per_page is 50 records.
| Parameters | Description |
|---|---|
page |
integer greater than or equal to 1 |
per_page |
integer between 1 and 100 |
Paginated responses include the following attributes:
| Attributes | Description |
|---|---|
count |
integer the total number of items |
data |
array list of objects |
next_href |
string URI to fetch the next page of results |
object |
string "list" |
previous_href |
string URI to fetch the previous page of results |
Example rate limiting headers
< X-Ratelimit-Limit: 600
< X-Ratelimit-Remaining: 9
< X-Ratelimit-Reset: 2018-02-02T16:39:00Z
In order to provide a high-quality of service for all customers, our API is rate limited. The current limit is 600 requests per minute across all endpoints. We reserve the right to adjust the rate limit for given endpoints.
If the rate limit is exceeded, the API responds with a HTTP 429 "Too Many Requests" status code. The response has a X-Ratelimit-Reset header that tells you when the rate limit count will reset.
Here are the headers related to rate limiting that our API returns for any requests:
| Header | Description |
|---|---|
X-Ratelimit-Limit |
Number of requests allowed per minute |
X-Ratelimit-Remaining |
Remaining number of requests allowed for the current minute |
X-Ratelimit-Reset |
Time at which the rate limit count resets |
Example idempotent worker creation request
$ curl -v -X POST https://api.checkrpay.com/customer/v0/workers \
    -H "Content-Type: application/json" \
    -H 'X-CHECKR-PAY-ACCESS-KEY: CHECKR_PAY_PROD_1000333' \
    -H 'X-CHECKR-PAY-SECRET-KEY: CHECKR_PAY_PROD_83ebeabdec09f6670863766f792ead24d61fe3f9' \
    -H 'Idempotency-Key: 40b23921-c005-4ec7-832a-3ae023dbbc11' \
    -d '{"metadata": "driver_12345", "backgroundCheckId": "e44aa283528e6fde7d542194", "profile": {"phoneNumber": "+14155552671", "email": "john@smith.com"}}'
The Checkr Pay API supports idempotency in POST requests. Use this feature to safely repeat POST requests without accidentally creating the same resources multiple times.
First, provide an Idempotency-Key: <key> header to the POST request. This header value will be used server side to recognize retries of the same request.
The client side must then generate a unique value for every POST request, and re-use the same header value in any subsequent retry attempts. We recommend the use of V4 UUIDs to avoid collisions.
When serving the request with a new idempotency key, the Checkr Pay API will save the response (including status code, headers, body) for the first request if it is successful (2xx status), and return the saved response for later requests with the same idempotency key. Error responses will not be cached.
Note: The idempotency key expires after 24 hours. Retries with an expired idempotency key will be handled as new requests.
The Checkr Pay API supports alphanumeric character input, as well as accented characters and some punctuation marks.
Corresponding regex character ranges: [a-zA-Z0-9ªµºÀ-ÖØ-öø-ÿ\-'., ]
Supported Accented Characters
| ª | µ | º | À | Á | Â | Ã | Ä | Å | Æ |
|---|---|---|---|---|---|---|---|---|---|
| Ç | È | É | Ê | Ë | Ì | Í | Î | Ï | Ð |
| Ñ | Ò | Ó | Ô | { | Ö | Ø | Ù | Ú | Û |
| Ü | Ý | Þ | ß | à | á | â | ã | ä | å |
| æ | ç | è | é | ê | ë | ì | í | î | ï |
| ð | ñ | ò | ó | ô | õ | ö | ø | ù | ú |
| û | ü | ý | þ | ÿ | ' | . | , | - |
The Checkr Pay uses HTTP response codes to represent the result of an API request.
- 2xx codes indicate success.
- 4xx codes indicate client-side errors
- 5xx indicate an internal Checkr Pay error For all error responses (i.e., non-2xx responses), Checkr Pay returns a standard data structure. The data structure is as follows:
| Field | Description |
|---|---|
http_code |
integer The HTTP response code |
error_code |
enum A standard error code representing the general cause of the error. |
error_message |
enum A human-readable error message representing the general cause of the error. |
details |
array An array of error details. Only included for input_validation_error responses. |
Example error
{
  "http_code": 400,
  "error_code": "input_validation_error",
  "error_message": "Invalid TaxRecord creation request.",
  "details": [
    {
      "key": "workerId",
      "errors": [
        "This worker has a status of pending. You must wait until the worker completes onboarding before creating a tax record."
      ]
    }
  ]
}
You may elect to handle certain error_code values programmatically. The following table includes a list of possible error_code values, along with the content of the details field for each code.
| Error Code | Description |
|---|---|
input_validation_error |
You provided invalid input data in your API request. You may re-attempt the request with corrected information. (HTTP 400) |
resource_not_found |
You attempted to access a resource that does not exist. (HTTP 404) |
unauthorized |
You provided invalid credentials. (HTTP 401) |
forbidden |
You attempted to access a resource without proper authorization. (HTTP 403) |
unexpected_error |
An unexpected error occurred. Please contact Checkr Pay support for more information. Do not re-attempt the request. (HTTP 500) |
When an input_validation_error is returned, the response contains a details field. The field is an array of ErrorDetail objects, where each ErrorDetail represents a specific error in your input data. Each ErrorDetail contains the following fields:
| Field | Description |
|---|---|
key |
enum The name of the field that caused the error. This will always be a field that you provided in your input equest. |
errors |
array An array of strings. Each string contains a human-readable error message explaining why the field was invalid. |
Many Checkr Pay objects - such as Workers and Payouts - contain a metadata field. You can use this field to provide a custom identifier for the object. For example, you may elect to provide a UUID to link the object with a specific record in your database.
Metadata is always optional, and you can leave a metadata field blank if you so desire. If metadata is provided, it must be unique for all instances of a specific object; every Worker, for example, must have a unique metadata value. However, metadata uniqueness is not enforced across different object types; thus, a Payout may have the same metadata as a Worker.
Metadata can be any value up to 50 charcters long, and can contain any supported characters.
During your development efforts in the Sandbox environment, you may realize that you need to reset worker information to continue testing some developments. Inside the Sandbox environment, Checkr Pay has created an All Worker Reset endpoint to reset all workers, and a Worker Reset to reset a single worker's registration to help you accomplish this!
Sending a POST request either of these endpoints will cause the worker's (or all workers') email and phone number information to reset, and will be available to be re-used.
Note that Checkr Pay supports re-use of the Checkr Background Checkr Candidate ID and the SSN. As long as the phone and email address are unique for a given worker, no resets are needed to re-use candidate_id or SSN.
A Worker represents an individual that receives payouts via the Checkr Pay platform. You can create a new Worker with the Create a New Worker endpoint. Once your worker is active, you can pay the worker instantly with the Create a new Payout endpoint, and file 1099 forms for the worker with the Create a new TaxRecord endpoint.
The lifecycle of a newly-created worker is as follows.
| Status | Description |
|---|---|
pending |
This state is one of two that may represents a worker that has just been created via the Create a new Worker endpoint. This is a temporary state, and a worker exits this state once they complete the embeddable onboarding flow. Typically, this happens within 30 seconds. However, if a worker fails to complete the onboarding flow (e.g., because they exited the app), the worker may remain in the pending state indefinitely. |
require_pii |
This state represents a worker that has just been created via the Create a new Worker endpoint, but does not have a comprehensive set of PII needed to complete banking KYC processes. This is a temporary state, and a worker exits this state once they complete the embeddable onboarding flow. Typically, this happens within 30 seconds. However, if a worker fails to complete the onboarding flow (e.g., because they exited the app), the worker may remain in the pending state indefinitely. |
onboarded |
A worker in this state has successfully completed the embeddable Checkr Pay onboarding flow. |
active |
A worker in this state has successfully completed the embeddable Checkr Pay onboarding flow, recieved a payout, and passed banking Know Your Customer checks. They are now fully active. Workers who are active may have their 1099 forms filed. |
manual_review |
A worker in this state has been flagged for manual review by the Checkr Pay system. <1% of workers enter this state. No action is required from you when a worker enters this state. Checkr Pay takes care of the entire manual review process, and prompts the worker via the embeddable component for any additional documentation required. |
denied |
A worker in this state has been denied from the Checkr Pay platform. It is rare for a worker to enter this state. If you see a worker in the denied state, contact Checkr Pay Support for more information. |
pending_closure |
A worker in this state has requested that their account be closed. In 7 days, the account will progress to a closed status. You can still file a 1099 for a worker in this state, but you can no longer send them a payout. |
closed |
A worker in this state has had their account closed. A worker enters this state if you request account closure via the Update a Worker endpoint. You can still file a 1099 for a worker in this state, but you can no longer send them a payout. |
failed |
An unhandled event occurred while trying to create this worker. When workers are in this state, you cannot file a 1099 or issue payouts. Generally this requires intervention from the Checkr Pay team to correct the failure. |
You receive a webhook for every worker state change. Use this webhook to trigger custom logic on your end. See the Webhooks page for more information.
For a visual representation of the Worker lifecycle - including the actions that you can take for a Worker in each state - see the state diagram below. 
A Payout represents a payment from you to a Worker. You can create a new Payout via the Create a New Payout endpoint.
The lifecycle of a newly-created Payout is as follows. All Payout state changes are made asynchronously by the Checkr Pay payouts engine. You do not need to request any state changes.
| Status | Description |
|---|---|
pending |
This state represents a Payout that has just been created via the Create a new Payout endpoint. The Payout is currently queued for asynchronous processing by the payouts engine. The Payout will be processed by the Checkr Pay payouts engine within 2-3 seconds, at which point the Payout is either completed or queued for manual_review. No action is required from you for a Payout in this state. |
queued |
This state represents a Payout that has just been created via the Create a new Payout endpoint for workers that have not yet activated their Checkr Pay accounts. The Payout will be queued for asynchronous processing by the payouts engine, and will be processed as soon as the worker activates their Checkr Pay account by accepting the Legal Consents. After that, the Payout move to a completed status . No action is required from you for a Payout in this state. |
completed |
This state represents a Payout that is completed. The Payout is fully settled and the worker has access to their funds in Checkr Pay. Typically, a Payout is completed within 2-3 seconds of creation. |
manual_review |
This state represents a Payout that has been queued for manual review. The Payout will be reviewed by the Checkr Pay Operations Team within 2-3 business hours. Our Operations team either approves the payout (status => completed) or denies it (status => canceled). No action is required from you for a Payout in this state; our team handles the end-to-end review process. |
canceled |
This state represents a Payout that we were unable to process. The Payout failed and no funds were transferred. It is rare for a Payout to enter this state. If you encounter a canceled Payout, contact Checkr Pay Support for assistance. |
For a visual representation of the Payout lifecycle - including the actions that you can take for a Payout in each state - see the state diagram below. 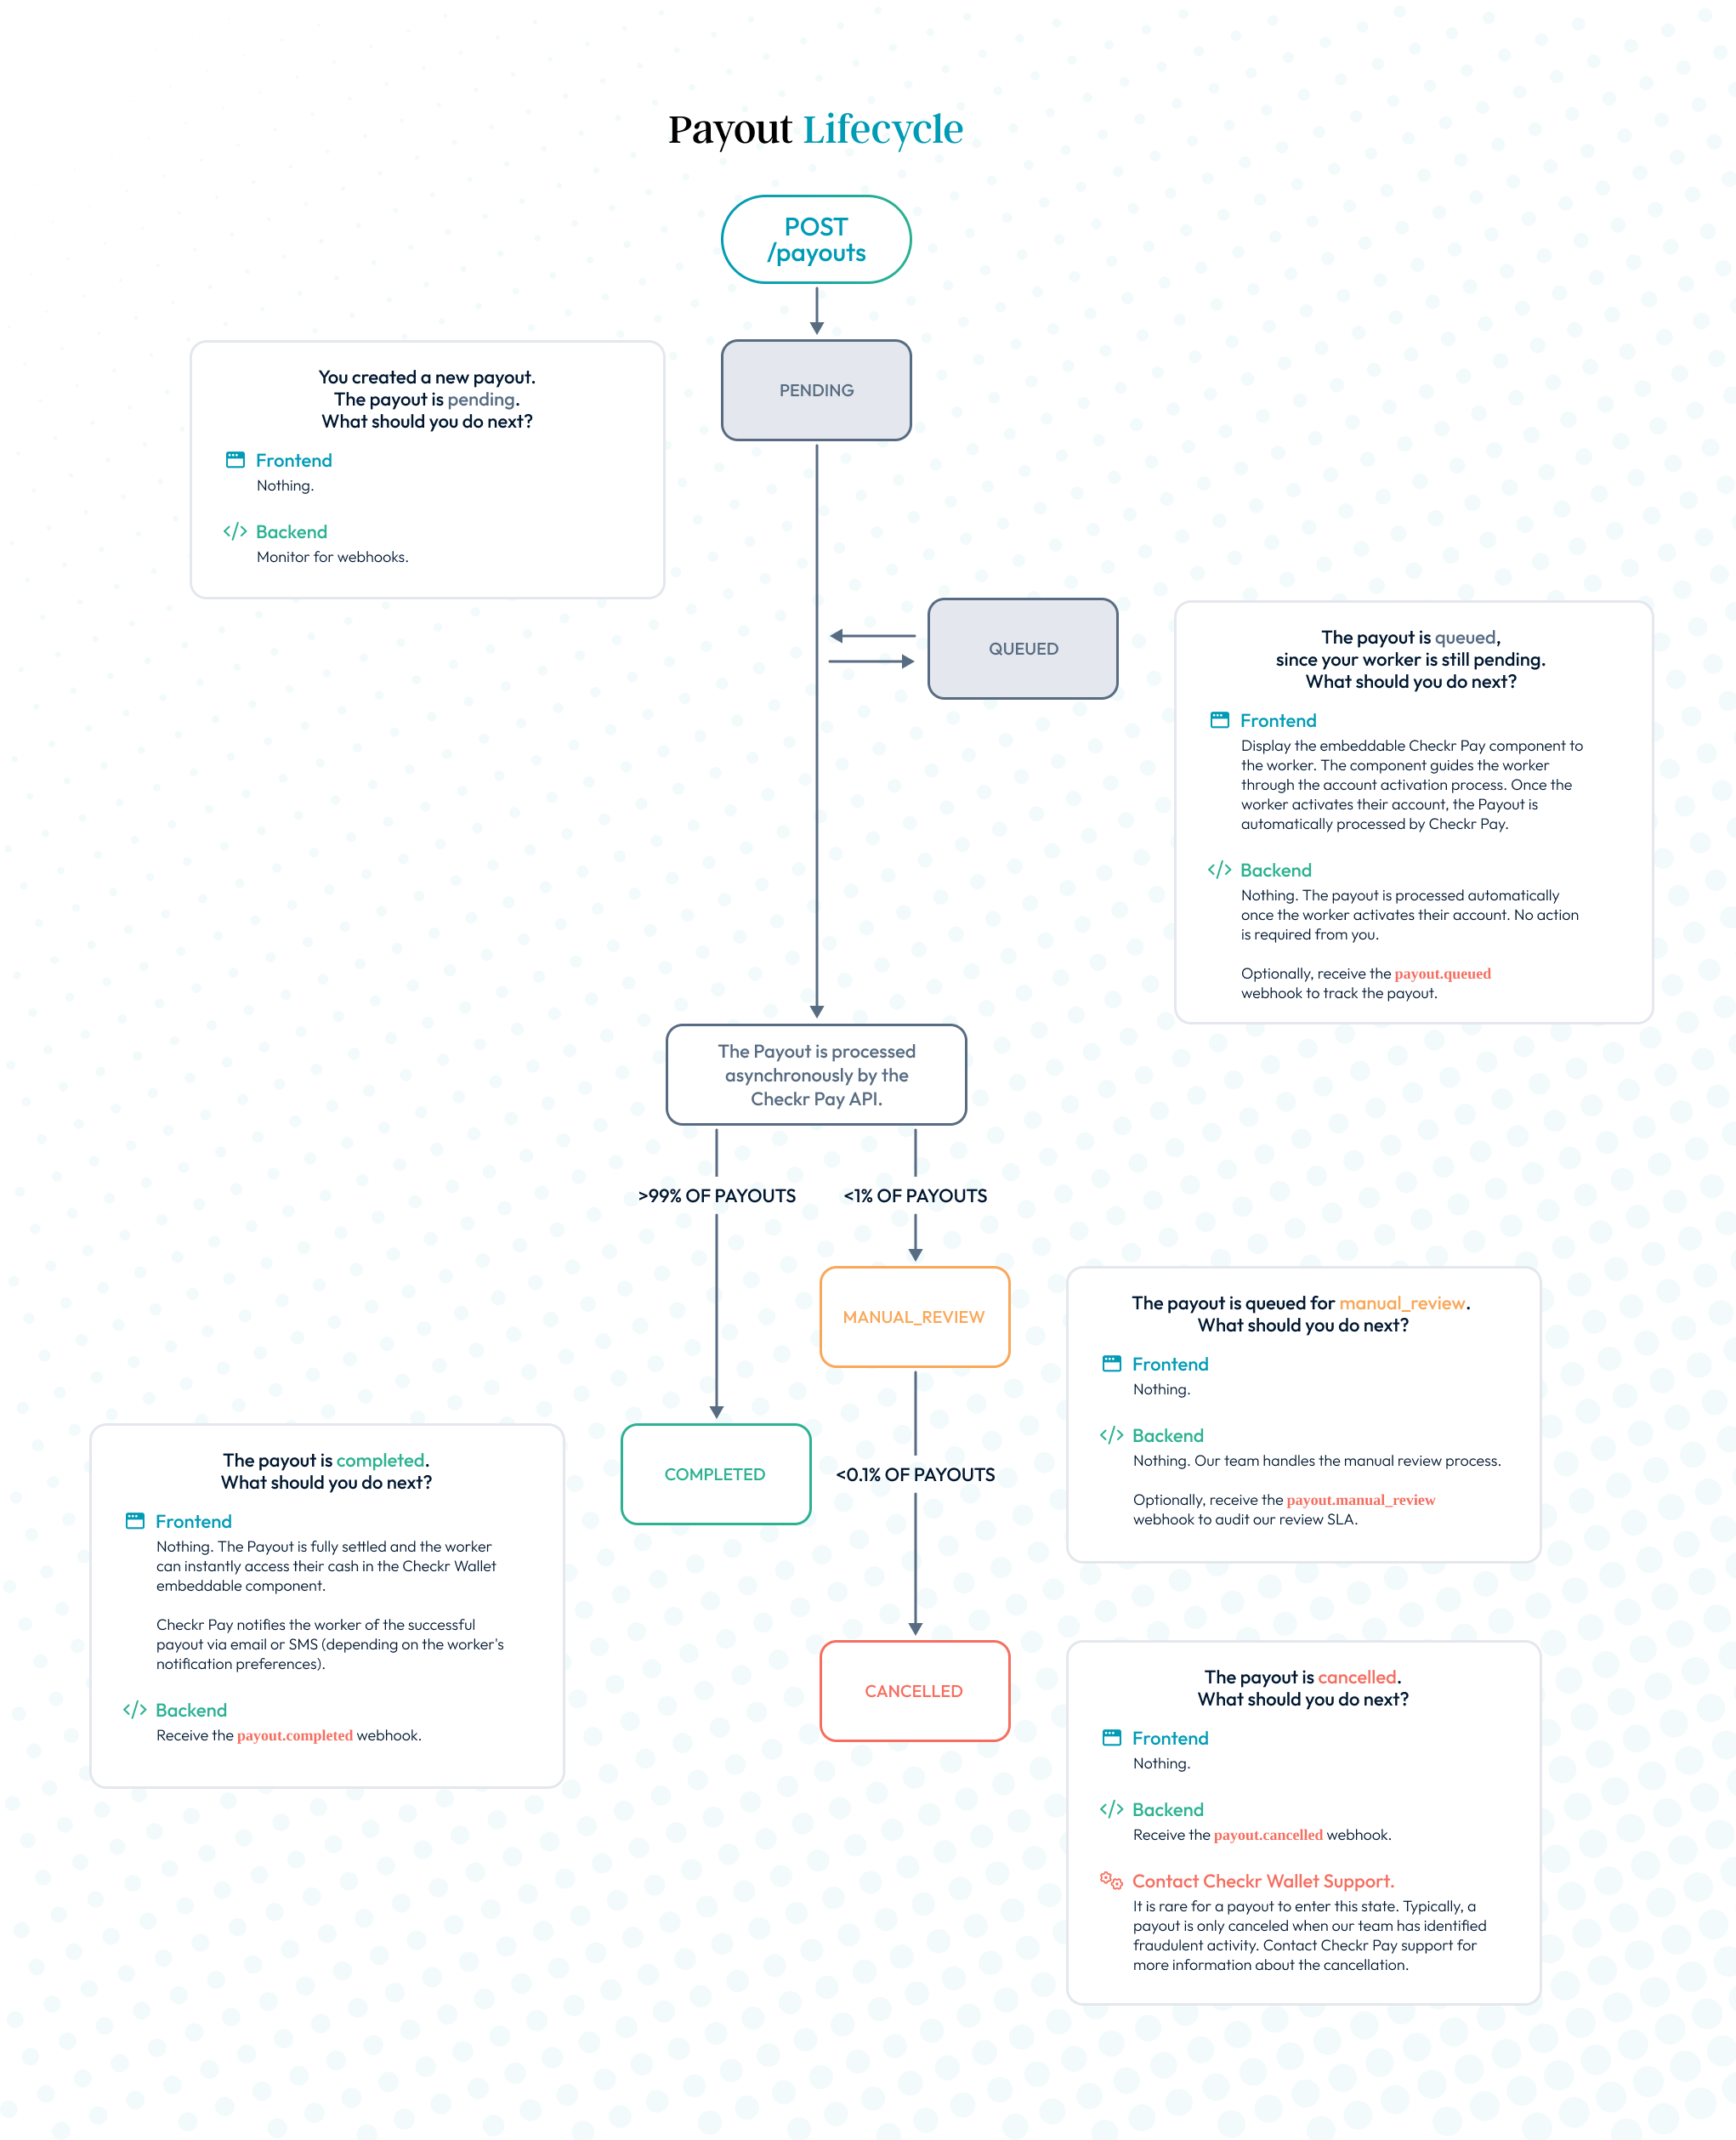
A TaxRecord represents a tax form (such as a 1099-MISC) that you file for a Worker. You can create a new TaxRecord via the Create a New TaxRecord endpoint. The lifecycle of a newly-created TaxRecord is as follows.
| Status | Description |
|---|---|
pending |
This state represents a TaxRecord that has just been created via the Create a new TaxRecord endpoint. The TaxRecord is currently queued for asynchronous processing by the tax engine. The TaxRecord will be processed by the Checkr Pay tax engine within 2-3 seconds, at which point the TaxRecord moves out of this state. No action is required from you for a TaxRecord in this state. |
waiting_for_approval |
This state represents a TaxRecord that has been generated by the tax engine. The TaxRecord is ready for filing, and is waiting for your approval. Approve the TaxRecord for filing by calling the Update a TaxRecord endpoint. |
approved |
This state represents a TaxRecord that is approved for filing. The TaxRecord is currently queued for asynchronous filing by the tax engine. The TaxRecord will be filed by the tax engine within 2-3 seconds, at which point the TaxRecord moves out of this state. No action is required from you for a TaxRecord in this state. |
filed |
This state represents a TaxRecord that has been successfully filed. The TaxRecord is fully filed with the IRS and is available for the worker to view in Checkr Pay. Typically, a TaxRecord is filed within 2-3 seconds of approval. |
canceled |
This state represents a TaxRecord that is canceled. Refer to the cancelCode for more information. A TaxRecord can be canceled either because you requested cancelation via the Update a TaxRecord endpoint (cancelCode == customer_requested), or because the tax engine encountered an error during filing (cancelCode == other) It is rare for a TaxRecord to have a cancelCode of other; if you encounter a TaxRecord with this cancelCode, contact Checkr Pay Support. |
For a visual representation of the TaxRecord lifecycle - including the actions that you can take for a TaxRecord in each state - see the state diagram below. 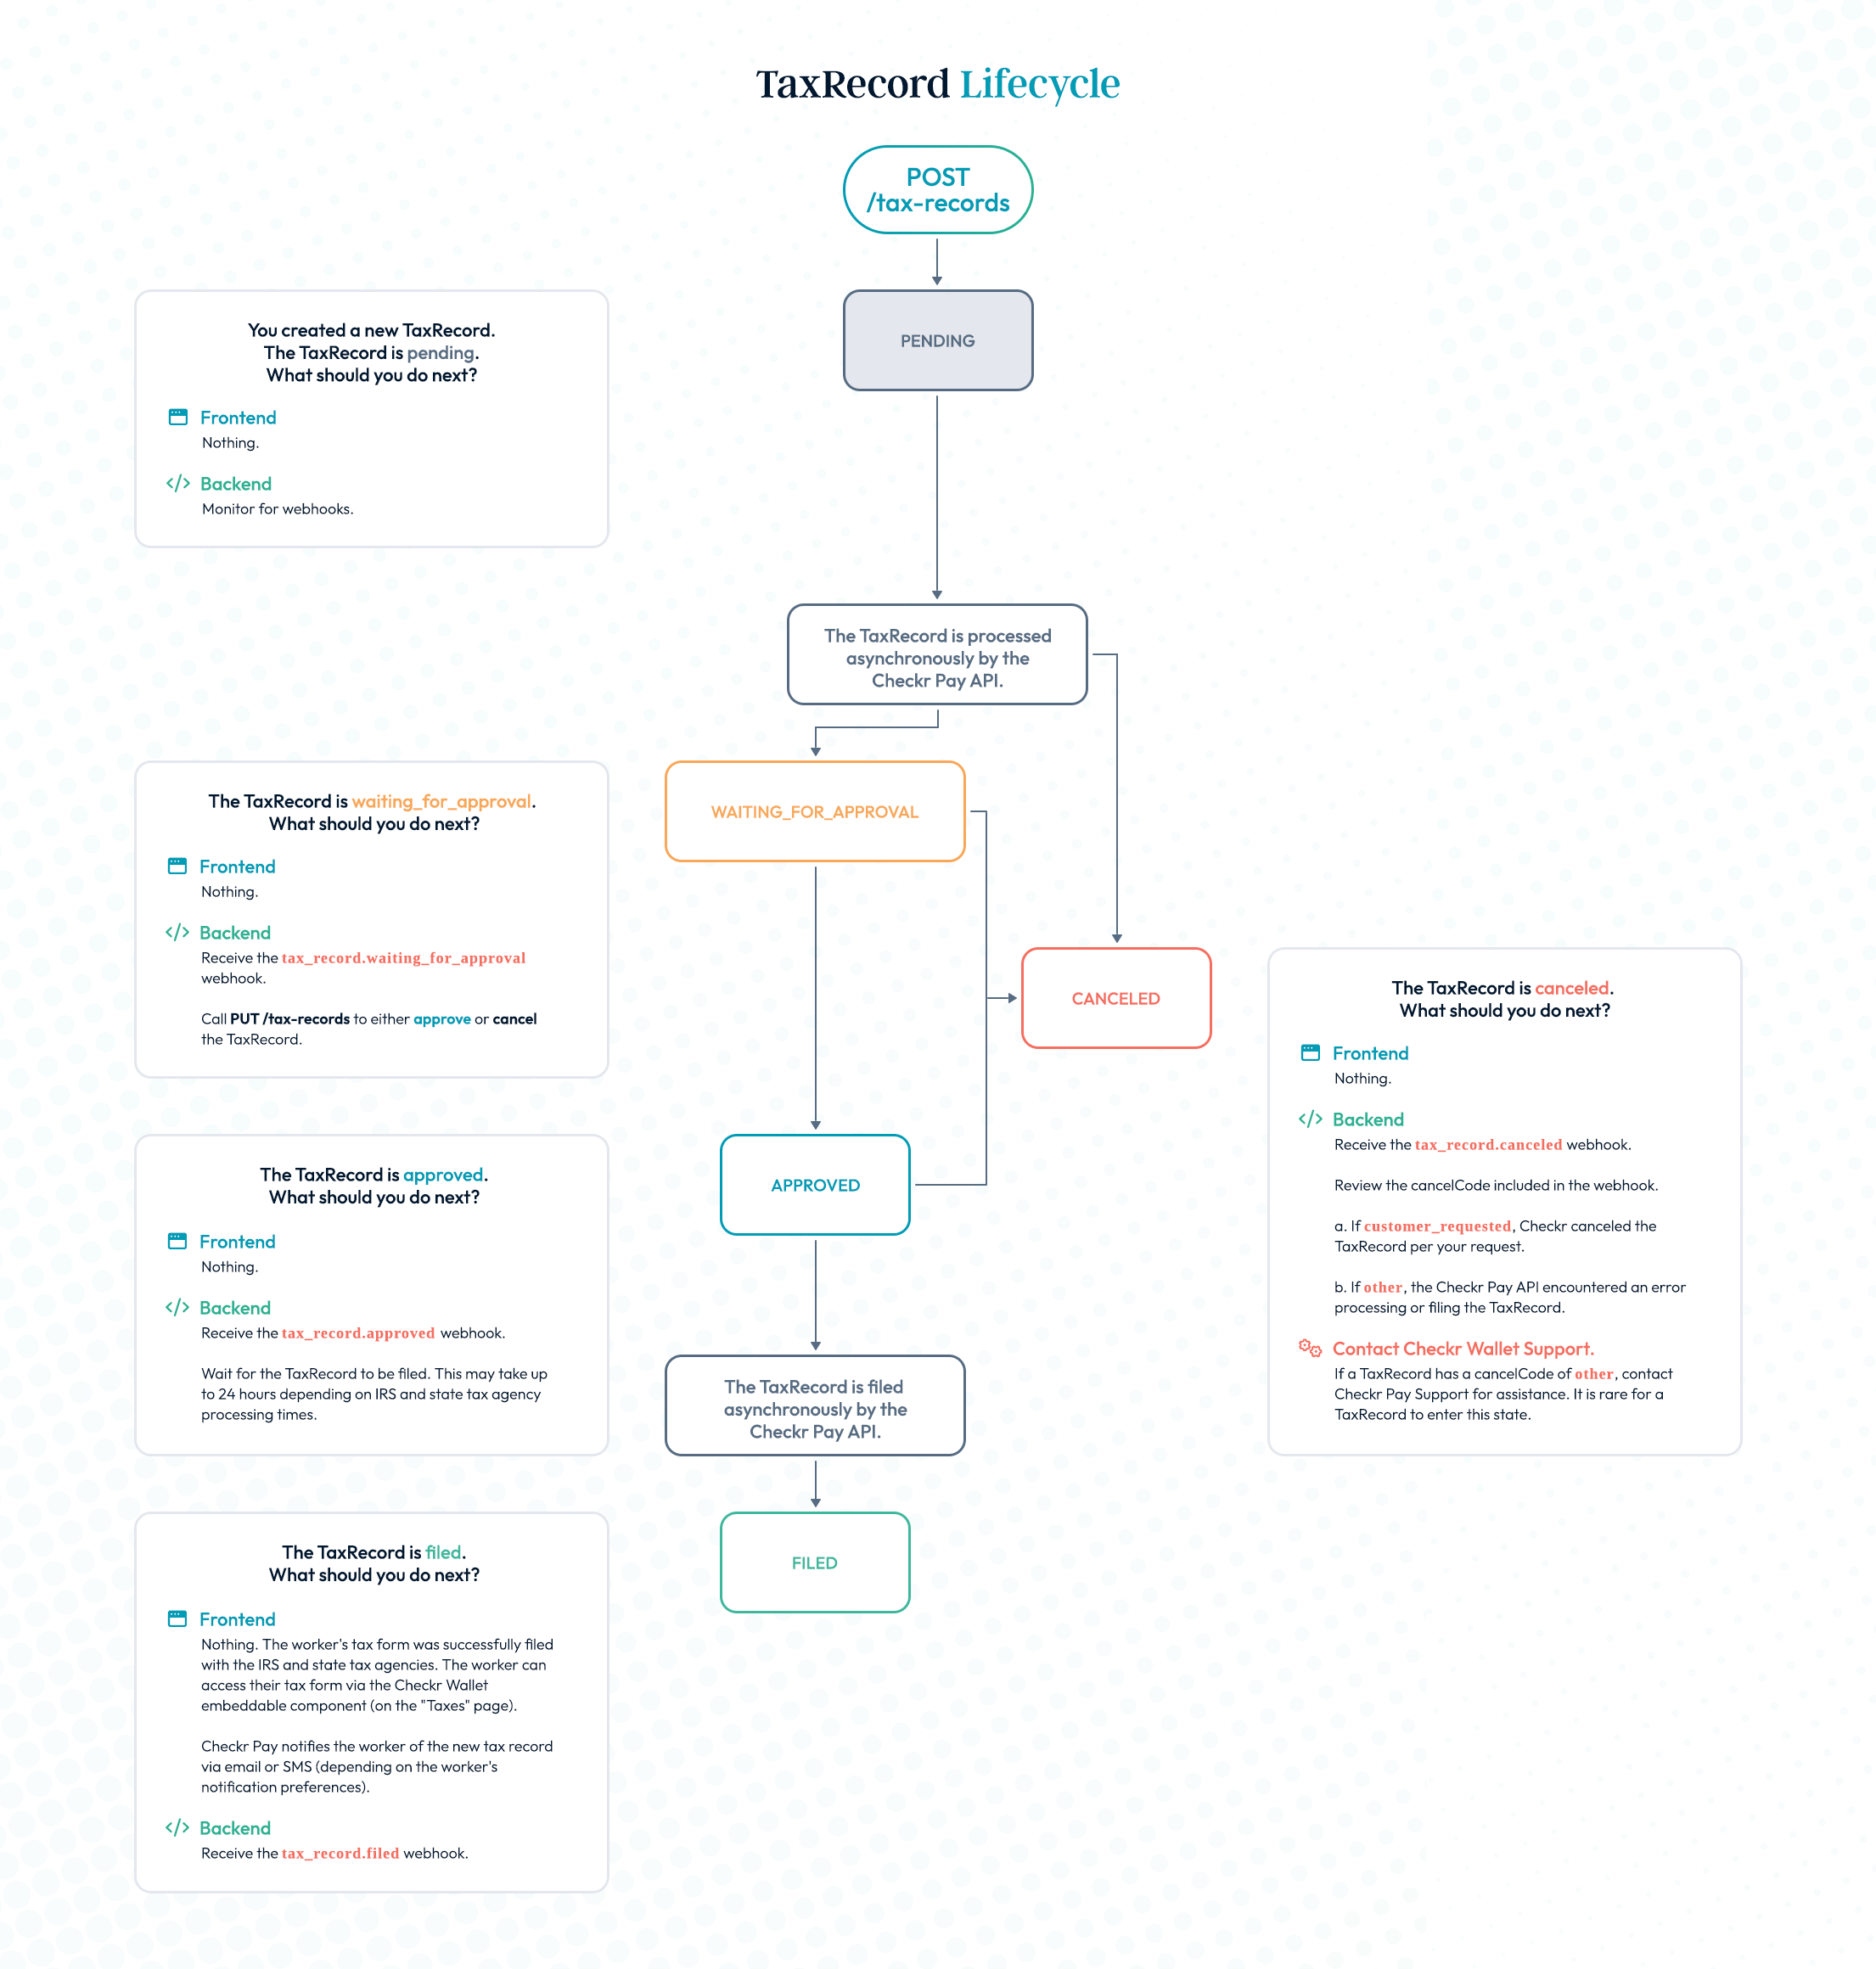
Create a new worker
This endpoint is used to onboard a new worker to Checkr Pay. Once created, the worker will receive a Checkr Pay account and debit card. The worker can then receive Payouts via the Create a new Payout endpoint.
Assumptions
- Your worker must have completed a background check through the Checkr screenings platform. You will need the worker's Candidate ID from a completed background check to create the worker in Checkr Pay. Checkr Pay securely pulls the worker's PII from their background check - so the worker doesn't need to enter it again.
There are two different IDs that Checkr Core uses when working with background check reports. The
candidate_idis the value that Checkr Pay uses to pull in the candidate PII and create a Checkr Pay Worker. If you are pulling a GET /report or listening to Checkr's Report webhooks, make sure that you use thecandidate_id.
- You must have a valid email address, phone number, and mailing address for the worker. This endpoint assumes that the email address, phone number, and mailing address you provide have already been validated (e.g., during your new worker onboarding flow).
Calling the Endpoint
To create a new worker, call this endpoint with the parameters listed below.
Checkr Pay responds with a newly-created worker in either the pending or require_pii state. The pending state indicates the worker's PII is complete and the worker is ready to complete the activation process. A require_pii state indicates that the worker's object needs some additional PII prior to activation. Workers in require_pii will need to enter additional fields during the activation process.
The worker object includes a temporary authentication token.
Pass the temporary authentication token to the Checkr Pay embeddable component to display a personalized experience to the worker.
This component guides the worker through the Checkr Pay onboarding process, which is typically completed in just a single tap.
The worker then moves to the active state.
Rarely, a worker may also move into the manual_review or denied states. For more information, see the Worker Lifecycle.
Request Body schema: application/json
Post the necessary fields for the API to create a new user.
| backgroundCheckId | string The worker's Checkr Background Check Candidate ID. The worker's KYC data is automatically populated from their background check. |
required | object The worker's profile data. This is provided by the customer and cannot be directly edited by the worker. |
| metadata | string Optional customer-provided worker metadata. This field is commonly used to label a Checkr Pay worker record with a custom identification value from your database (e.g, an employee identification number. |
Responses
Request samples
- curl
- Python
- Node.js
curl -i -X POST \
  https://api.checkrpay.com/customer/v0/workers \
  -H 'Content-Type: application/json' \
  -H 'X-CHECKR-PAY-ACCESS-KEY: YOUR_API_KEY_HERE' \
  -H 'X-CHECKR-PAY-SECRET-KEY: YOUR_API_KEY_HERE' \
  -d '{
    "metadata": "driver_12345",
    "backgroundCheckId": "e44aa283528e6fde7d542194",
    "profile": {
      "phoneNumber": "+14155552671",
      "email": "john@smith.com",
      "address": {
        "street": "1 Montgomery Street",
        "street2": "St 2400",
        "city": "San Francisco",
        "state": "CA",
        "postalCode": "94104",
        "country": "US"
      }
    }
  }'
Response samples
- 200
- 400
{- "id": "123e4567-e89b-12d3-a456-426614174000",
- "metadata": "driver_12345",
- "createdAt": 1385798567,
- "temporaryAuthenticationToken": "dNJDUdffkgn3k209rt73o223of",
- "backgroundCheckId": "e44aa283528e6fde7d542194",
- "profile": {
- "phoneNumber": "+14155552671",
- "email": "john@smith.com",
- "address": {
- "street": "1 Montgomery Street",
- "street2": "St 2400",
- "city": "San Francisco",
- "state": "CA",
- "postalCode": "94104",
- "country": "US"
}
}, - "status": "pending"
}Retrieve workers
Retrieve all Worker objects. Filter by created_at date with the created_before and created_after query parameters.
This is a paginated endpoint. See the Pagination documentation for more information.
query Parameters
| metadata | string Search for a worker with a specific metadata value. Example: metadata=fd09c9d3-067f-488e-937a-313de48da3e0 |
| created_before | string Returns workers created before the input date. Example: created_before=10-30-2022 |
| created_after | string Returns workers created after the input date. Example: created_after=10-30-2022 |
Responses
Request samples
- curl
- Python
- Node.js
curl -i -X GET \
  https://api.checkrpay.com/customer/v0/workers \
  -H 'X-CHECKR-PAY-ACCESS-KEY: YOUR_API_KEY_HERE' \
  -H 'X-CHECKR-PAY-SECRET-KEY: YOUR_API_KEY_HERE'
Response samples
- 200
{- "data": [
- {
- "id": "123e4567-e89b-12d3-a456-426614174000",
- "metadata": "driver_12345",
- "createdAt": "2022-09-27T20:41:13.680Z",
- "temporaryAuthenticationToken": null,
- "backgroundCheckId": "e44aa283528e6fde7d542194",
- "profile": {
- "phoneNumber": "14155552671",
- "email": "john@smith.com",
- "address": {
- "street": "1 Montgomery Street",
- "street2": "St 2400",
- "city": "San Francisco",
- "state": "CA",
- "postalCode": "94104",
- "country": "US"
}
}, - "status": "active"
}, - {
- "id": "ed90f806-b698-4b0b-92b9-64d4027568e0",
- "metadata": "driver_12345",
- "createdAt": "2022-09-27T20:41:13.680Z",
- "temporaryAuthenticationToken": null,
- "backgroundCheckId": "79f943e212cce7de21c054a8",
- "profile": {
- "phoneNumber": "14155552671",
- "email": "example@example.com",
- "address": {
- "street": "245 E. 73rd Street",
- "street2": null,
- "city": "New York",
- "state": "NY",
- "postalCode": "10021",
- "country": "US"
}
}, - "status": "pending"
}
], - "object": "list",
- "next_href": null,
- "previous_href": null,
- "count": 2
}Retrieve a worker
Retrieve a single worker by ID.
path Parameters
| id required | string ID of worker to retrieve. |
Responses
Request samples
- curl
- Python
- Node.js
curl -i -X GET \
  https://api.checkrpay.com/customer/v0/workers/:id \
  -H 'X-CHECKR-PAY-ACCESS-KEY: YOUR_API_KEY_HERE' \
  -H 'X-CHECKR-PAY-SECRET-KEY: YOUR_API_KEY_HERE'
Response samples
- 200
- 404
{- "id": "123e4567-e89b-12d3-a456-426614174000",
- "metadata": "driver_12345",
- "createdAt": "2022-09-27T20:41:13.680Z",
- "temporaryAuthenticationToken": "dNJDUdffkgn3k209rt73o223of",
- "backgroundCheckId": "e44aa283528e6fde7d542194",
- "profile": {
- "phoneNumber": "14155552671",
- "email": "john@smith.com",
- "address": {
- "street": "245 E. 73rd Street",
- "street2": null,
- "city": "New York",
- "state": "NY",
- "postalCode": "10021",
- "country": "US"
}
}, - "status": "active"
}Update a worker
Update a single Worker.
The following fields can be updated at this time. If you attempt to update a field other than the ones listed below, a 400 - Bad Request error returned.
metadata
Update a worker's metadata via this endpoint. Keep in mind that metadata must be unique across all your workers.
path Parameters
| id required | string ID of worker to retrieve. |
Request Body schema: application/json
| metadata | string Optional customer-provided worker metadata. This field is commonly used to label a Checkr Pay worker record with a custom identification value from your database (e.g, an employee identification number). |
Responses
Request samples
- curl
- Python
- Node.js
curl -i -X PUT \
  https://api.checkrpay.com/customer/v0/workers/:id \
  -H 'Content-Type: application/json' \
  -H 'X-CHECKR-PAY-ACCESS-KEY: YOUR_API_KEY_HERE' \
  -H 'X-CHECKR-PAY-SECRET-KEY: YOUR_API_KEY_HERE' \
  -d '{
    "metadata": "string"
  }'
Response samples
- 200
- 404
{- "id": "123e4567-e89b-12d3-a456-426614174000",
- "metadata": "driver_12345",
- "createdAt": "2022-09-27T20:41:13.680Z",
- "temporaryAuthenticationToken": "dNJDUdffkgn3k209rt73o223of",
- "backgroundCheckId": "e44aa283528e6fde7d542194",
- "profile": {
- "phoneNumber": "14155552671",
- "email": "john@smith.com",
- "address": {
- "street": "245 E. 73rd Street",
- "street2": null,
- "city": "New York",
- "state": "NY",
- "postalCode": "10021",
- "country": "US"
}
}, - "status": "pending"
}Close a worker account
Closes a worker's account. Accounts can be re-opened, although doing so requires contacting Checkr Pay Support.
This endpoint initiates the account closure process explained below.
If the worker is active, this endpoint immediately moves the worker to the pending_closure state. The worker remains in this state for 7 business days, and they can withdraw their balance during this time.
Earners in pending_closure state can continue to recieve payouts.
After 7 business days, the worker is placed in the closed state and their account is fully closed.
For workers not in the active status, there is no waiting period. This endpoint immediately moves the worker to the closed state.
Checkr Pay sends your application a webhook for every Worker state change. See the Webhooks page for more information.
path Parameters
| id required | string ID of worker to retrieve. |
Responses
Request samples
- curl
- Python
- Node.js
curl -i -X DELETE \
  https://api.checkrpay.com/customer/v0/workers/:id \
  -H 'X-CHECKR-PAY-ACCESS-KEY: YOUR_API_KEY_HERE' \
  -H 'X-CHECKR-PAY-SECRET-KEY: YOUR_API_KEY_HERE'
Response samples
- 200
- 404
{- "id": "123e4567-e89b-12d3-a456-426614174000",
- "metadata": "driver_12345",
- "createdAt": "2022-09-27T20:41:13.680Z",
- "backgroundCheckId": "e44aa283528e6fde7d542194",
- "profile": {
- "phoneNumber": "14155552671",
- "email": "john@smith.com",
- "address": {
- "street": "245 E. 73rd Street",
- "street2": null,
- "city": "New York",
- "state": "NY",
- "postalCode": "10021",
- "country": "US"
}
}, - "status": "pending_closure"
}Authenticate a worker
Generate a new Temporary Authentication Token (TAT) for this worker. The TAT is a one-time session token that you generate when a worker accesses the embeddable component.
This endpoint should be called only after the worker has:
Logged in to your worker portal; and
Requested access to the Checkr Wallet experience (e.g., by clicking on a menubar item).
Once you generate a TAT and display the embeddable to the worker, Checkr Pay displays a personalized, signed-in experience to the worker. To access sensitive information, Checkr Pay prompts the worker to complete a second step of authentication for extra security. This is typically a SMS verification challenge.
TATs are intended for one-time use. You must generate a new TAT every time the worker accesses the embeddable. Otherwise, the worker may see a session expired erorr.
If you call this end point frequently and want to avoid prompting the worker for a second authentication, provide a x-checkr-pay-worker-session-id header which corresponds to the worker's logged in session in your application.
path Parameters
| id required | string ID of worker to authenticate. |
header Parameters
| x-checkr-pay-worker-session-id | string An id corresponding to the worker's login session from your system. When provided the TAT will be cached for a 12 hour period. |
Responses
Request samples
- curl
- Python
- Node.js
curl -i -X GET \
  https://api.checkrpay.com/customer/v0/workers/:id/authenticate \
  -H 'X-CHECKR-PAY-ACCESS-KEY: YOUR_API_KEY_HERE' \
  -H 'X-CHECKR-PAY-SECRET-KEY: YOUR_API_KEY_HERE'
Response samples
- 200
- 404
{- "temporaryAuthenticationToken": "dNJDUdffkgn3k209rt73o223of"
}Reset a specific Sandbox Account Test Worker
This endpoint is only available in the Checkr Pay Sandbox, and is intended only to facilitate testing.
Checkr Pay requires that each worker associated with your account have a unique phone number and email address.
Calling this endpoint will reset registration data associated with the specific worker identified in the URL path. That worker's email and phone number registration will be reset for all workers, and may be used again.
Note that Checkr Pay allows for the re-use of a Checkr Background Check ID to create multiple workers in the Sandbox environemnt.
path Parameters
| id required | string ID of Worker to Reset. |
Responses
Request samples
- curl
- Python
- Node.js
curl -i -X POST \
  https://api.checkrpay.com/customer/v0/sandbox/workers/reset/:id \
  -H 'X-CHECKR-PAY-ACCESS-KEY: YOUR_API_KEY_HERE' \
  -H 'X-CHECKR-PAY-SECRET-KEY: YOUR_API_KEY_HERE'
Response samples
- 200
- 400
OK
Reset all Sandbox Account Test Workers
This endpoint is only available in the Checkr Pay Sandbox, and is intended only to facilitate testing.
Checkr Pay requires that each worker associated with your account have a unique phone number and email address.
Calling this endpoint will reset registration data associated with all workers in your sandbox. Worker email and phone number registrations will be reset for all workers, and may be used again.
Note that Checkr Pay allows for the re-use of a Checkr Background Check ID to create multiple workers in the Sandbox environemnt.
Responses
Request samples
- curl
- Python
- Node.js
curl -i -X POST \
  https://api.checkrpay.com/customer/v0/sandbox/workers/reset_all \
  -H 'X-CHECKR-PAY-ACCESS-KEY: YOUR_API_KEY_HERE' \
  -H 'X-CHECKR-PAY-SECRET-KEY: YOUR_API_KEY_HERE'
Create a new Payout
Send a Payout to a worker. To send a payout, call this endpoint with the parameters below.
Checkr Pay returns a newly-created payout in the pending state. The payout is then queued for asynchronous processing by the payouts engine.
Payouts are typically processed within 2-3 seconds of creation. If successful, the payout moves to the completed state - indicating that the Payout is settled and the funds have cleared into the worker's account.ding.
If a worker has not completed onboarding, Checkr Pay will create the payout in a queued status. Once the earner has completed their onboarding, Checkr Pay will attempt issuing the created payout within minutes, and if successful, the funds will be credited to their account.
Payouts Are Processed Asynchronously
Checkr Pay processes payouts in an asynchronous way. Because of this, simply submitting a payout won't give you an immediate status of whether it was successful or not.
Checkr Pay strongly recommends listening to Checkr Pay's Payouts webhooks. Alternatively, you can request status by calling the Retrieve a Payout endpoint.
See the Webhooks page for more information.
Request Body schema: application/json
| workerId required | string The ID of the worker to receive this Payout. The worker must be |
| metadata | string <= 256 characters Optional customer-provided Payout metadata. This field is commonly used to label a Checkr Pay payout record with a custom identification value from your database (e.g, a ride ID). |
| description | string <= 256 characters A plain language description of the Payout. This will be shown to the worker. |
| amountCents required | integer The Payout amount, in cents. |
| requestId required | string <= 256 characters Customer-supplied unique identifier used for idempotentency throughout the Pay ecosystem for this specific payout. |
object Defines the strategy for issuing the payout. The embedded object defines the parameters for issuing the payout. | |
| purpose | string Defining a payout purpose allows you to control how Checkr Pay treats certain payouts. Checkr Pay current supports two different types:
|
object You may define up to 3 distinct payout groupings. Payout groupings define the keys you use within the object. Each grouping has to be uniquely defined and values pre-loaded. Contact Checkr Pay support for more information. |
Responses
Request samples
- curl
- Python
- Node.js
curl -i -X POST \
  https://api.checkrpay.com/customer/v0/payouts \
  -H 'Content-Type: application/json' \
  -H 'X-CHECKR-PAY-ACCESS-KEY: YOUR_API_KEY_HERE' \
  -H 'X-CHECKR-PAY-SECRET-KEY: YOUR_API_KEY_HERE' \
  -d '{
    "workerId": "fd09c9d3-067f-488e-937a-313de48da3e0",
    "requestId": "sf_1313101-20240505",
    "issuanceStrategy": {
      "name": "manual"
    },
    "metadata": "sf_1313101",
    "description": "$100 Payout for a job well done!",
    "purpose": "earning",
    "amountCents": 10000,
    "groups": {
      "lineOfBusiness": "nursing",
      "region": "SFBay"
    }
  }'
Response samples
- 201
- 400
{- "id": "123e4567-e89b-12d3-a456-426614174000",
- "metadata": "tx_1313101",
- "requestId": "tx_1313101-20240505",
- "description": "$100 payout for a job well done!",
- "workerId": "fd09c9d3-067f-488e-937a-313de48da3e0",
- "amountCents": 10000,
- "status": "pending",
- "groups": {
- "lineOfBusiness": "Delivery",
- "region": "San Francisco",
- "costCenter": "Mobile Business West Coast"
}, - "createdAt": "2022-09-27T20:41:13.680Z",
- "completedAt": null,
- "canceledAt": null,
- "cancelCode": null
}Retrieve payouts
Retrieve all Payout objects for a given worker. Filter by created_at date with the created_before and created_after query parameters.
This does not include payouts issued via the Create Repayment endpoint.
This is a paginated endpoint. See the Pagination documentation for more information.
query Parameters
| workerId | string Worker ID to retrieve Payouts for. Example: workerId=fd09c9d3-067f-488e-937a-313de48da3e0 |
| metadata | string Search for a Payout with a specific metadata value. Example: metadata=fd09c9d3-067f-488e-937a-313de48da3e0 |
| created_before | string Returns payouts created before the input date. Example: created_before=10-30-2022 |
| created_after | string Returns payouts created after the input date. Example: created_after=10-30-2022 |
| queued | string Returns payouts that are queued Example: queued=true |
Responses
Request samples
- curl
- Python
- Node.js
curl -i -X GET \
  https://api.checkrpay.com/customer/v0/payouts \
  -H 'X-CHECKR-PAY-ACCESS-KEY: YOUR_API_KEY_HERE' \
  -H 'X-CHECKR-PAY-SECRET-KEY: YOUR_API_KEY_HERE'
Response samples
- 200
- 404
{- "data": [
- {
- "id": "6b98e0a7-536e-4858-b5fd-bd069fa9257e",
- "metadata": "payout_43434",
- "requestId": "payout_43434-20240509",
- "description": "$100 incentive for 09/15/2022 shift at Sacred Heart Hospital Neuro ICU. Thanks for all you do to keep our healthcare system running!",
- "workerId": "522a2f1b-e0d0-4c72-a37c-5fb6ecf22e9f",
- "purpose": "earning",
- "amountCents": 10000,
- "status": "completed",
- "groups": {
- "lineOfBusiness": "nursing",
- "region": "SFBay"
}, - "createdAt": "2022-09-27T20:41:13.680Z",
- "completedAt": "2022-09-27T20:42:13.680Z",
- "canceledAt": null,
- "cancelCode": null
}, - {
- "id": "123e4567-e89b-12d3-a456-426614174000",
- "metadata": "tx_1313101",
- "requestId": "tx_1313101-20240509",
- "description": "$100 payout for a job well done!",
- "workerId": "fd09c9d3-067f-488e-937a-313de48da3e0",
- "purpose": "earning",
- "amountCents": 10000,
- "status": "queued",
- "queuingReason": "waiting_on_manual_issuance",
- "groups": {
- "lineOfBusiness": "nursing",
- "region": "SFBay"
}, - "createdAt": "2022-09-27T20:41:13.680Z",
- "completedAt": null,
- "canceledAt": null,
- "cancelCode": null
}
], - "object": "list",
- "next_href": null,
- "previous_href": null,
- "count": 2
}Retrieve a Payout
Retrieve a single Payout by ID.
path Parameters
| id required | string ID of Payout. |
Responses
Request samples
- curl
- Python
- Node.js
curl -i -X GET \
  https://api.checkrpay.com/customer/v0/payouts/:id \
  -H 'X-CHECKR-PAY-ACCESS-KEY: YOUR_API_KEY_HERE' \
  -H 'X-CHECKR-PAY-SECRET-KEY: YOUR_API_KEY_HERE'
Response samples
- 200
- 404
{- "id": "123e4567-e89b-12d3-a456-426614174000",
- "metadata": "payout_12345",
- "description": "$100 incentive for 09/15/2022 shift at Sacred Heart Hospital Neuro ICU. Thanks for all you do to keep our healthcare system running!",
- "workerId": "522a2f1b-e0d0-4c72-a37c-5fb6ecf22e9f",
- "amountCents": 10000,
- "purpose": "earning",
- "status": "completed",
- "createdAt": "2022-09-27T20:41:13.680Z",
- "completedAt": "2022-09-27T20:42:13.680Z",
- "canceledAt": null,
- "cancelCode": null
}Cancel a Payout
Cancel a single Payout by ID. This operation is only available during certain payout states like queued or pending.
path Parameters
| id required | string ID of Payout. |
Responses
Request samples
- curl
- Python
- Node.js
curl -i -X POST \
  https://api.checkrpay.com/customer/v0/payouts/:id \
  -H 'X-CHECKR-PAY-ACCESS-KEY: YOUR_API_KEY_HERE' \
  -H 'X-CHECKR-PAY-SECRET-KEY: YOUR_API_KEY_HERE'
Response samples
- 200
- 400
{- "id": "123e4567-e89b-12d3-a456-426614174000",
- "metadata": "payout_12345",
- "description": "$100 incentive for 09/15/2022 shift at Sacred Heart Hospital Neuro ICU. Thanks for all you do to keep our healthcare system running!",
- "workerId": "522a2f1b-e0d0-4c72-a37c-5fb6ecf22e9f",
- "purpose": "reimbursement",
- "amountCents": 10000,
- "status": "canceled",
- "createdAt": "2022-09-27T20:41:13.680Z",
- "canceledAt": "2022-09-27T20:42:13.680Z"
}Issue a previously created payout
Instruct Checkr Pay to issue a payout that was previously created with an issuanceStrategy of manual. Note that this has no effect if you issue the payout request after the autoIssueOn date (if it was included in your original request).
This has no effect for issuanceStrategy of instant because Checkr Pay will process these payouts and issue them immediately after posting the API request.
When this instruction is received, Checkr Pay will initiate the steps needed to issue and fulfill the payout to the earner's selected payout method.
You can listen to payout.completed webhooks to track and update payout status within your systems.
Note that while Checkr Pay will issue the payout according to the earner's selected payout method. For ACH-based payout methods, this means that the fulfillment of the payout may still take 2-3 business days.
path Parameters
| id required | string ID of payout Example: 981e4567-f69a-15d3-a156-4126614174839 |
Responses
Request samples
- curl
- Python
- Node.js
curl -i -X POST \
  https://api.checkrpay.com/customer/v0/payouts/:id/issue \
  -H 'X-CHECKR-PAY-ACCESS-KEY: YOUR_API_KEY_HERE' \
  -H 'X-CHECKR-PAY-SECRET-KEY: YOUR_API_KEY_HERE'
Response samples
- 200
- 404
{- "id": "123e4567-e89b-12d3-a456-426614174000",
- "description": "Repayment for: $100 incentive for 09/15/2022 shift at Sacred Heart Hospital Neuro ICU.",
- "workerId": "522a2f1b-e0d0-4c72-a37c-5fb6ecf22e9f",
- "amountCents": 10000,
- "status": "completed",
- "purpose": "earning",
- "createdAt": "2022-09-27T20:41:13.680Z",
- "completedAt": "2022-09-31T20:42:13.680Z",
- "canceledAt": null,
- "cancelCode": null
}Repay a payout
Send the worker a negative amount payout corresponding to a previous payout. It uses the original payout's amount and description with a Repayment for: prefix.
Be aware of adverse earner experiences when using this feature and only issue repayments as a final resort.
Checkr Pay can partner with you to discuss workflow enhancements that could reduce the need for using this feature.
path Parameters
| id required | string ID of payout Example: 981e4567-f69a-15d3-a156-4126614174839 |
Responses
Request samples
- curl
- Python
- Node.js
curl -i -X POST \
  https://api.checkrpay.com/customer/v0/payouts/:id/repay \
  -H 'X-CHECKR-PAY-ACCESS-KEY: YOUR_API_KEY_HERE' \
  -H 'X-CHECKR-PAY-SECRET-KEY: YOUR_API_KEY_HERE'
Response samples
- 200
- 404
{- "id": "123e4567-e89b-12d3-a456-426614174000",
- "description": "Repayment for: $100 incentive for 09/15/2022 shift at Sacred Heart Hospital Neuro ICU.",
- "workerId": "522a2f1b-e0d0-4c72-a37c-5fb6ecf22e9f",
- "amountCents": -10000,
- "status": "completed",
- "purpose": "earning",
- "createdAt": "2022-09-27T20:41:13.680Z",
- "completedAt": "2022-09-27T20:42:13.680Z",
- "repaymentFor": "981e4567-f69a-15d3-a156-4126614174839",
- "canceledAt": null,
- "cancelCode": null
}Retrieve repayments
Retrieve all Payout objects created via repayments for a given payout. Filter by created_at date with the created_before and
created_after query parameters.
This is a paginated endpoint. See the Pagination documentation for more information.
path Parameters
| id required | string ID of payout Example: 981e4567-f69a-15d3-a156-4126614174839 |
Responses
Request samples
- curl
- Python
- Node.js
curl -i -X GET \
  https://api.checkrpay.com/customer/v0/payouts/:id/repayments \
  -H 'X-CHECKR-PAY-ACCESS-KEY: YOUR_API_KEY_HERE' \
  -H 'X-CHECKR-PAY-SECRET-KEY: YOUR_API_KEY_HERE'
Response samples
- 200
- 404
{- "data": [
- {
- "id": "123e4567-e89b-12d3-a456-426614174000",
- "description": "Repayment for: $100 incentive for 09/15/2022 shift at Sacred Heart Hospital Neuro ICU.",
- "workerId": "522a2f1b-e0d0-4c72-a37c-5fb6ecf22e9f",
- "amountCents": -10000,
- "status": "completed",
- "purpose": "earning",
- "createdAt": "2022-09-27T20:41:13.680Z",
- "completedAt": "2022-09-27T20:42:13.680Z",
- "repaymentFor": "981e4567-f69a-15d3-a156-4126614174839",
- "canceledAt": null,
- "cancelCode": null
}
], - "object": "list",
- "next_href": null,
- "previous_href": null,
- "count": 1
}Create a new TaxRecord
Call this endpoint to create a new tax form for your worker.
This endpoint returns a newly-created TaxRecord in the pending state.
The TaxRecord is then queued for asynchronous processing by the Checkr Pay tax engine, which processes it within 2-3 seconds - and moves it into one of the following states:
waiting_for_approval: this state indicates that the TaxRecord was successfully generated, and is now queued for your approval. To approve the TaxRecord and queue it for filing with the IRS, call the Update a TaxRecord endpoint.canceled: this state indicates that the TaxRecord failed generation. Contact Checkr Support for more information.
Checkr Pay sends your application a webhook to announce this state change (along with all other state changes to TaxRecords). See the Webhooks page for more information.
Request Body schema: application/json
| workerId | string The worker this tax record is for. You can only file a tax form for a Worker who has an active account (i.e., status = active), or has previously had an active account that is now closed (i.e., st atus = closed). |
| taxYear | integer The year this tax record is for. You can only file tax forms for completed tax years (i.e., wait until January 1, 2023 before filing a tax form for 2022). |
| taxFormType | string The type of tax form to generate for the worker. |
Responses
Request samples
- curl
- Python
- Node.js
curl -i -X POST \
  https://api.checkrpay.com/customer/v0/tax_records \
  -H 'Content-Type: application/json' \
  -H 'X-CHECKR-PAY-ACCESS-KEY: YOUR_API_KEY_HERE' \
  -H 'X-CHECKR-PAY-SECRET-KEY: YOUR_API_KEY_HERE' \
  -d '{
    "workerId": "fd09c9d3-067f-488e-937a-313de48da3e0",
    "taxYear": 2021,
    "taxFormType": "1099-NEC"
  }'
Response samples
- 201
- 400
{- "id": "123e4567-e89b-12d3-a456-426614174000",
- "workerId": "fd09c9d3-067f-488e-937a-313de48da3e0",
- "taxYear": 2020,
- "taxFormType": "1099-NEC",
- "generatedPdf": null,
- "generatedData": null,
- "status": "pending",
- "createdAt": "2022-09-27T20:41:13.680Z",
- "filedAt": null,
- "canceledAt": null,
- "cancelCode": null
}Retrieve TaxRecords
Retrieve all TaxRecord obejcts satisfying the search criteria. Filter by year range with the first_tax_year and last_tax_year query parameters.
This is a paginated endpoint. See the Pagination documentation for more information.
query Parameters
| workerId required | string Worker ID to retrieve tax records for. Example: workerId=fd09c9d3-067f-488e-937a-313de48da3e0 |
| first_tax_year | integer First tax year to retrieve tax records for. Example: first_tax_year=2020 |
| last_tax_year | integer Last tax year to retrieve tax records for. Example: last_tax_year=2022 |
Responses
Request samples
- curl
- Python
- Node.js
curl -i -X GET \
  'https://api.checkrpay.com/customer/v0/tax_records?workerId=fd09c9d3-067f-488e-937a-313de48da3e0' \
  -H 'X-CHECKR-PAY-ACCESS-KEY: YOUR_API_KEY_HERE' \
  -H 'X-CHECKR-PAY-SECRET-KEY: YOUR_API_KEY_HERE'
Response samples
- 200
- 404
{- "data": [
- {
- "id": "123e4567-e89b-12d3-a456-426614174000",
- "workerId": "fd09c9d3-067f-488e-937a-313de48da3e0",
- "taxYear": 2020,
- "taxFormType": "1099-NEC",
- "generatedPdf": "VGhpcyBpcyBhIDEwOTkgUERGIGZvcm0u",
- "generatedData": {
- "void": false,
- "corrected": false,
- "calendarYear": 2020,
- "payerName": "NurseBolt, LLC",
- "payerAddress": {
- "street": "1 Montgomery Street Suite 1234",
- "city": "San Francisco",
- "state": "CA",
- "zip": "94104"
}, - "recipientTinRedacted": "xxx-xx-1234",
- "recipientName": "Jenny Terry Smith",
- "recipientAddress": {
- "street": "437 Lytton",
- "city": "Palo Alto",
- "state": "CA",
- "zip": "94301"
}, - "recipientAccountNumber": null,
- "boxOneCents": 1000,
- "boxTwo": false,
- "boxFourCents": 1000,
- "boxFive": null,
- "boxSix": null,
- "boxSeven": null
}, - "status": "filed",
- "createdAt": "2022-09-27T20:41:13.680Z",
- "filedAt": "2022-09-27T20:43:13.680Z",
- "canceledAt": null,
- "cancelCode": null
}, - {
- "id": "123e4567-e89b-12d3-a456-426614174000",
- "workerId": "fd09c9d3-067f-488e-937a-313de48da3e0",
- "taxYear": 2021,
- "taxFormType": "1099-NEC",
- "generatedPdf": null,
- "generatedData": null,
- "status": "pending",
- "createdAt": "2022-09-27T20:41:13.680Z",
- "filedAt": null,
- "canceledAt": null,
- "cancelCode": null
}
], - "object": "list",
- "next_href": null,
- "previous_href": null,
- "count": 2
}Retrieve a TaxRecord
Retrieve a single TaxRecord by ID.
path Parameters
| id required | string ID of TaxRecord to retrieve or edit. |
Responses
Request samples
- curl
- Python
- Node.js
curl -i -X GET \
  https://api.checkrpay.com/customer/v0/tax_records/:id \
  -H 'X-CHECKR-PAY-ACCESS-KEY: YOUR_API_KEY_HERE' \
  -H 'X-CHECKR-PAY-SECRET-KEY: YOUR_API_KEY_HERE'
Response samples
- 200
- 404
{- "id": "123e4567-e89b-12d3-a456-426614174000",
- "workerId": "fd09c9d3-067f-488e-937a-313de48da3e0",
- "taxYear": 2020,
- "taxFormType": "1099-NEC",
- "generatedPdf": "VGhpcyBpcyBhIDEwOTkgUERGIGZvcm0u",
- "generatedData": {
- "void": false,
- "corrected": false,
- "calendarYear": 2020,
- "payerName": "NurseBolt, LLC",
- "payerAddress": {
- "street": "1 Montgomery Street Suite 1234",
- "city": "San Francisco",
- "state": "CA",
- "zip": "94104"
}, - "recipientTinRedacted": "xxx-xx-1234",
- "recipientName": "Jenny Terry Smith",
- "recipientAddress": {
- "street": "437 Lytton",
- "city": "Palo Alto",
- "state": "CA",
- "zip": "94301"
}, - "recipientAccountNumber": null,
- "boxOneCents": 1000,
- "boxTwo": false,
- "boxFourCents": 1000,
- "boxFive": null,
- "boxSix": null,
- "boxSeven": null
}, - "status": "filed",
- "createdAt": "2022-09-27T20:41:13.680Z",
- "filedAt": null
}Update a TaxRecord
Update a single TaxRecord.
Use this endpoint to update the status of a TaxRecord. Valid state changes are as follows:
Approve a TaxRecord by changing the status from
waiting_for_approvaltoapprovedCancel a TaxRecord by changing the status from
pending/waiting_for_approvaltocanceled.
If you approve a TaxRecord, it is queued for filing with the IRS.
Once filed, it moves into the filed state.
If you cancel a TaxRecord, it is moved into the canceled state and can no longer be edited or filed.
If you would like to file the 1099, you will need to create a new TaxRecord.
If properly configured via the admin dashboard, you will receive a webhook for every state change. See the Webhooks page for more information.
path Parameters
| id required | string ID of TaxRecord to retrieve or edit. |
Request Body schema: application/json
| status | string New status for the TaxRecord. |
Responses
Request samples
- curl
- Python
- Node.js
curl -i -X PUT \
  https://api.checkrpay.com/customer/v0/tax_records/:id \
  -H 'Content-Type: application/json' \
  -H 'X-CHECKR-PAY-ACCESS-KEY: YOUR_API_KEY_HERE' \
  -H 'X-CHECKR-PAY-SECRET-KEY: YOUR_API_KEY_HERE' \
  -d '{
    "status": "approved"
  }'
Response samples
- 200
- 404
{- "id": "123e4567-e89b-12d3-a456-426614174000",
- "workerId": "fd09c9d3-067f-488e-937a-313de48da3e0",
- "taxYear": 2021,
- "taxFormType": "1099-MISC",
- "generatedPdf": null,
- "generatedData": null,
- "status": "pending",
- "createdAt": "2022-09-27T20:41:13.680Z",
- "filedAt": null
}